We as adults all rely on visual helpers every day. We use calendars, day timers, street signs, grocery lists, maps, and so on. Using visual cues in our environment allows us to plan, organize, and most of all be independent. Visuals are equally important to children because they are just beginning to learn how things work in the world.
Why do visual supports make it easier for children to understand and communicate?
- Words “disappear” right after we say them, visuals hold time and space.
- Visuals direct attention to them and hold attention.
- Visuals allow more time to process the information.
- Visuals assist in remembering.
- Using the same words every time a visual is shown, teaches your child those words.
Anything we see that helps us with communication by giving us information with our eyes is a visual support. The type of visual that works best with each individual child depends on what is meaningful to the child. The most widely recommended visuals are those that are used to provide children with information.
For example, labels placed around the home or classroom help to inform your child where to find and where to put materials. Rules provide your child with clear expectations. Other types of visuals that give information in a logical, structured and sequential form consist of schedules, mini-schedules, and “first/then” boards. Activity choice boards allow your child to make selections during their play.
The previously named visuals can be presented in several formats, depending on your child’s level of understanding. Ranging from most concrete to most abstract, possible visuals are:
- Objects – this would be considered the first level of visual representations and would include the actual objects (e.g., for some children, seeing a sandwich in their parent’s/teacher’s hand tells them “it’s time for lunch.”)
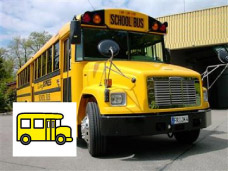
- Colour photographs – this would consist of coloured photographs of the concrete objects (e.g., for some children being shown a photograph of a bus means “we’re going to daycare” OR “we’re going home”)
- Black and white photographs – this level would consist of the same photographs but in black and white
- Colour line drawings – these are picture symbols that are often used with children who are able to understand at this level of abstraction
- Black and white line drawings – these are also picture symbols and serve the same purpose as coloured lined drawings
- Miniature objects – these are smaller versions of the objects
Larger pictures should be used with children who are just learning to associate the picture with the object. Smaller pictures can be used when children are familiar with the pictures and what they represent. You can help your child to move to a more abstract format by associating the pictures. For example, a photograph of a bus can have a small picture symbol of a bus pasted on the bottom corner to demonstrate to the child that they both mean the same thing.
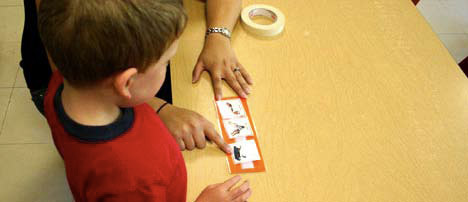
If there are two or more pictures in a series, most speech-language pathologists recommend that they be arranged vertically (top to bottom) for children who are just learning to follow a sequence, and horizontally (from left to right) for children who demonstrate any pre-reading skills.
Tip: remember to place visuals at your child’s eye level.
Here is a closer look at some visuals that you can use:
Labels in the Home and Classroom
-
- provide information about where to find items
- demonstrate where items need to be put away
- allow for more independence in accessing materials
- promote your child’s understanding of visuals representing objects
How to Use Labels in the Home or Classroom
- using one format of visuals, label different rooms (e.g., bedroom) or areas (e.g., cubby)
- place the picture at your child’s eye level
- always have the name of the area printed with the picture
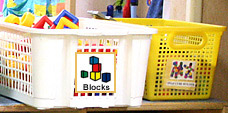
- label toys and toy shelves with pictures of the items on them
- toy cupboards – individual bins can be labeled as well as the place on the shelf where the bin belongs
Rules
- provide a clear, consistent description of expectations
- when posted in an accessible place, they can be referred to whenever necessary, such as when your child does not seem to understand what is expected
How to Use Rules
- decide on the main rules by discussing them with your child, children and others
- use positive wording to state how your child should behave (e.g., “Walk” rather than “Don’t run”)
- post in a visible area at your child’s eye level
- refer your child to the posted rules when he is not behaving accordingly
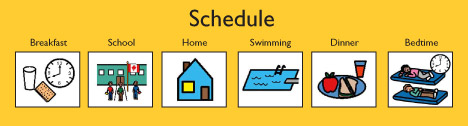
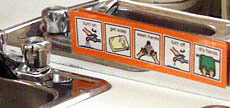
Schedules
- help alleviate your child’s anxiety
- improve your child’s understanding and cooperation
- provide your child with information about:
- what regular activities are happening that day
- what is the sequence of events to come
- what new activities will occur
- what is not happening
- when it is time to stop one activity and start another
Which Visuals to Use
- use a maximum of six or seven visuals in the sequence
- identify times of the day which are noticeably different from each other (e.g., when location changes or when activities change)
- choose symbols that are general enough that they cover the range of possibilities for the activity (e.g., “lunch time” rather than a specific food)
- label pictures with the exact words that you and others will use to refer to the activity
Where to Put a Schedule
- mount in a visible place where the schedule can be referred to easily (e.g., at their classroom desk, in your child’s bedroom)
- keep it accessible for your child to refer to on his own
How to Use a Schedule
- choose a specific time(s) of the day where you can go over the pictures on the schedule with your child and name the pictures in order
- remove each picture once the activity is completed (e.g., snack time is finished)
- show the picture of the upcoming activity especially if your child does not wish to change activities (e.g., tidy up, then go outside)
- show changes in the regular routine by changing the pictures and describing the change (e.g., no daycare, today stay home)
Mini-Schedules
- supplement the daily schedule
- direct choices or sequence of activities
- are often more detailed than schedules and therefore can teach specific skills
How to Use a Mini-Schedule
- provide mini-schedules within the area of your home where additional information is needed (e.g., a “wash hands” mini-schedule above the sink, a “washroom” mini-schedule near the toilet)
- provide pictures for the main steps required to complete the task (e.g., turn on water, get soap, wash hands, turn off water, dry hands)
- introduce the mini-schedule to your child during the activity which it describes the specific steps
- point to each picture and say the words associated with step in the sequence as it is being carried out
- use consistent language, stressing the main words (e.g., get soap)
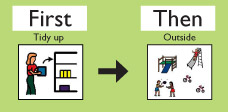
First/Then Boards
- teach logical sequences of events (e.g., “First tidy up, then go outside”)
- visually clarify step-by-step instructions
- assist with skill-building by motivating your child to engage in a less-preferred activity knowing that a preferred activity will follow
How to Use First/Then Boards
- the “first” picture is always an activity that you want your child to engage in such as a transition or skill-building activity
- the “then” picture reinforces the “first” activity by being an activity or object your child enjoys
- show the first/then board to your child and name the activities while pointing to the pictures
- assist your child in carrying out the sequence
Choice Boards
- provide information about what options are available
- may be used to broaden your child’s play interests
- prompt your child to make a request or choice
- clarify spoken language
How to Use Activity Choice Boards:
- if using the choice board to expand your child’s play interests place some pictures of activities that he does not usually choose
- if you are trying to encourage your child to make a choice independently, place pictures of activities or toys that he already likes and a picture of a non-preferred activity — to ensure that he is making a choice
- start by placing 2 pictures of possible activities your child may choose from on a board and gradually add more pictures
- your child may indicate his choice by vocalizing, verbalizing, or gesturing
- give your child the indicated choice (e.g., activity, object, food) immediately to reinforce having made a choice
In the Classroom:
There are two different types of activity choice boards:
- Classwide – usually consists of a board with activity pockets where each child places his name card in the pocket of the activity in which he would like to engage. There are several variations of this type. The board may have enough velcro spots for the corresponding number of children who can play at each classroom area. Or, each child may have a name pocket where the activity card is placed. Some teachers have each child choose their first activity at the end of circle time using this method. Other teachers require the child to move their name card as they change activities throughout the day.
- Individual – a few possible activities are presented on a board. The choices may be presented to broaden your child’s play repertoire (and therefore consist of some activities not usually chosen) or to encourage her to indicate a selection (and therefore depict activities that she already likes). If your child is just learning to make a choice, a non-preferred activity should also be represented to ensure that she is making a choice. Your child may indicate her choice by vocalizing, verbalizing, or gesturing. She should receive the indicated choice immediately to reinforce having made a choice.
Circle Time Song Boards
- provide the opportunity to make a choice independently
- help keep attention
- provide consistent, repetitive language
- expand your child’s ability to understand and use language
How to Use Song Choice Boards
- find props or pictures that correspond to a few of your child’s favourite songs
- make a board onto which the props and/or pictures can be mounted using tape or velcro
- name the songs represented on the board and ask your child, “Do you want ‘Twinkle, Twinkle, Little Star’ or ‘Eensy Weensy Spider’?”
- if your child is nonverbal, she can indicate her song choice through eye gaze, pointing, or gesturing
- if your child uses verbal language, she can indicate a song choice by naming the item
- remove and hold up the prop or picture for your child to see while singing
- turn over or put away the prop or picture when the song is finished
Try using some of these visual supports in your home or classroom to help your child understand better and to communicate with others.
References:
Hogdon, L. (1995). Visual Strategies for Improving Communication. Quirk Roberts Publishing.