ConnectABILITY Homepage

What is After High School Graduation?

When your son or daughter starts high school is a good time to start looking. Your son or daughter’s school will help in this process. Agencies and the Guidance department of your son/daughter’s school can also be contacted for assistance with this.

A student with an intellectual disability can remain in school until age 21. If you chose that option, it means that your child will be spending 7 years in high school. The Transition Plan will help you prepare for life after high school.

In the TCDSB, they have designated a staff person, Penny McCormick, from their Career Access Dept. who can assist with after high school transition planning. Ask to have her attend one of your meetings.

The TDSB also has a Career Advisory Committee for Students with Special Needs that hosts “Career Carousel’s” and other interesting presentations. Ask for information about at you child’s school.

It is often suggested that you and your child think about what they want to do after graduating and then work backwards to help you decide what you need to do to get there. Taking note of what your child’s gifts and strengths are and where their talents and interests lay will be help with planning.

Some students want to continue their education after graduating and one program you may want to look at is Humber College’s CICE Program, “Community Integration Through Cooperative Education”. Seneca and George Brown Colleges also offer college vocational programs. You will need to check the admission criteria as it has been reported that the student must be at a grade 5 literacy level.

There are also a number of day programs running in the city. The information for these can be accessed from the article Community Participation Supports – Community Directories – Toronto

  • Developmental Services Ontario – Toronto Region [DSO-TR] – a list of MCCSS funded agencies providing Community Participation Supports.
  • Fee for service programs in Toronto.
  • 211 Toronto – your connection to information about community, social, health and related government services.

Competitive Employment is another option for some individuals. ODSP Employment Supports provide vocational assessments as well as support.

Some individuals choose to include some time spent doing volunteer work and/or being involved in some sort of recreational activity as part of their week’s schedule. Some have even chosen to start their own businesses!

The possibilities are endless and should be as individual as your child is. It is never too early to start planning and to build a network of support around your child and yourself that will help your family throughout your child’s life.

One last suggestion would be to become a member of a local organization that serves individuals with intellectual disabilities. It is one of the best ways to be kept abreast of all the information that is available as well as activities/workshops that you and/or your child may be interested in participating in. If you’re able to get involved, it also provides you with one way of connecting with other parents, from whom I believe you learn the most from and helps to develop a united voice.

Frequently Asked Question:

Parents often wonder when exactly their child graduates and wonder if it has to do with which month they turn 21. I just had it explained to me, and here it is:

A student graduates in June of the calendar year he/she turns 21 – Eg. If someone is born Jan. 1, 1985, they graduate in June 2006. If someone is born Dec. 31, 1985, they also graduate in June, 2006. The month of birth does not matter, only the year of birth. The rationale for this is that when the call goes out for JK registration, it is for children who were born in a specific year – Eg. 2001. In September of the first school year, some children will be 3 years old, some will be 4 years old – but in the 2004 calendar year, by Dec.31 all will be 4 years old. When these students graduate in June of the year they turn 21, some will be 20 and others will be 21 – BUT they will all have had the exact same number of years in school.

Good luck. Your efforts will pay off!

What does Employment Mean to You?

An Employment Supports Questionnaire

True or False:

  1. Community Living Toronto’s Employment Supports department is associated with ODSP.
  2. I am allowed to look for work on my own while I am with Employment Supports/Job Placement Services.
  3. ODSP Employment Supports guarantees I get a paid job.
  4. My Job Coach will allow me to work independently and will not go to work with me every day.
  5. The best person to guarantee your success at work is you.
  6. If I don’t want paid employment, Job Placement Services will set me up with permanent unpaid training opportunities.
  7. If I am having trouble at work, Job Placement Services will help me out.
  8. Job Placement Services won’t find me part-time employment.
  9. I might lose some or all of my ODSP Income Support benefits if I work.

    Answers

  1. TRUE – Community Living Toronto is one of several ODSP Employment Supports service providers.
  2. TRUE – You are more than welcome to find a job on your own. If you do find an employer who is interested in hiring or interviewing you, we can assist you and, if necessary, will meet with the employer in order to explain our services further.
  3. FALSE – Getting hired depends on your commitment, skills, attitude, and many other factors. Job Placement Services can provide you with a job opportunity, but it is up to you to get yourself hired.
  4. TRUE – Community Living Toronto’s Job Placement Services will assist you in your job search and can provide initial support during training. Ultimately you will be expected to work independently. We are always just a phone call away to help you deal with difficult situations.
  5. TRUE – While employment situations do not always work out, it is always up to you to impress the employer with a positive attitude, strong work ethics and the willingness to learn the job. If nothing else, leaving a good impression on one employer makes for a great reference.
  6. FALSE – ODSP Employment Supports is set up ONLY for paid (minimum wage or higher) job placements. Job Placement Services provides employment supports for individuals with intellectual disabilities as outlined under the policy directives of the ODSP Employment Supports.
  7. TRUE – Job Placement Services will provide you with support as needed. It is important to keep in mind that ODSP Employment Supports is not geared towards individuals requiring long-term one-on-one support. Your Job Coach will only be on the job-site as needed.
  8. FALSE – Job Placement Services is connected with employers who need all types of employees – part-time, full-time, and even seasonal.
  9. TRUE – Although having a job typically means you will have more money in your household budget, your ODSP Income Supports benefits may be affected by the amount of money you earn. Speak to your ODSP caseworker if this is a concern.

For more information on ODSP Employment Supports, go to:

http://www.mcss.gov.on.ca/en/mcss/programs/social/odsp/employment_support/index.aspx or call us at (416) 750-0666

Using Visuals

photo of child using a visual sequence

We as adults all rely on visual helpers every day. We use calendars, day timers, street signs, grocery lists, maps, and so on. Using visual cues in our environment allows us to plan, organize, and most of all be independent. Visuals are equally important to children because they are just beginning to learn how things work in the world.

Why do visual supports make it easier for children to understand and communicate?

  • Words “disappear” right after we say them, visuals hold time and space.
  • Visuals direct attention to them and hold attention.
  • Visuals allow more time to process the information.
  • Visuals assist in remembering.
  • Using the same words every time a visual is shown, teaches your child those words.

Anything we see that helps us with communication by giving us information with our eyes is a visual support. The type of visual that works best with each individual child depends on what is meaningful to the child. The most widely recommended visuals are those that are used to provide children with information.

For example, labels placed around the home or classroom help to inform your child where to find and where to put materials. Rules provide your child with clear expectations. Other types of visuals that give information in a logical, structured and sequential form consist of schedules, mini-schedules, and “first/then” boards. Activity choice boards allow your child to make selections during their play.

The previously named visuals can be presented in several formats, depending on your child’s level of understanding. Ranging from most concrete to most abstract, possible visuals are:

  • Objects – this would be considered the first level of visual representations and would include the actual objects (e.g., for some children, seeing a sandwich in their parent’s/teacher’s hand tells them “it’s time for lunch.”)
  • Colour photographs – this would consist of coloured photographs of the concrete objects (e.g., for some children being shown a photograph of a bus means “we’re going to daycare” OR “we’re going home”)
  • Black and white photographs – this level would consist of the same photographs but in black and white
  • Colour line drawings – these are picture symbols that are often used with children who are able to understand at this level of abstraction
  • Black and white line drawings – these are also picture symbols and serve the same purpose as coloured lined drawings
  • Miniature objects – these are smaller versions of the objects

Larger pictures should be used with children who are just learning to associate the picture with the object. Smaller pictures can be used when children are familiar with the pictures and what they represent. You can help your child to move to a more abstract format by associating the pictures. For example, a photograph of a bus can have a small picture symbol of a bus pasted on the bottom corner to demonstrate to the child that they both mean the same thing.

photo of a real bus picture with a small Boardmaker pic on the bottom right corner

If there are two or more pictures in a series, most speech-language pathologists recommend that they be arranged vertically (top to bottom) for children who are just learning to follow a sequence, and horizontally (from left to right) for children who demonstrate any pre-reading skills.

Tip: remember to place visuals at your child’s eye level.

Here is a closer look at some visuals that you can use:

Labels in the Home and Classroom

    • provide information about where to find items
    • demonstrate where items need to be put away
    • allow for more independence in accessing materials
    • promote your child’s understanding of visuals representing objects

How to Use Labels in the Home or Classroom

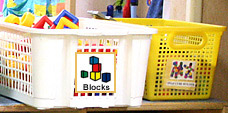
photo of toy box with boardmaker label on it

  • using one format of visuals, label different rooms (e.g., bedroom) or areas (e.g., cubby)
  • place the picture at your child’s eye level
  • always have the name of the area printed with the picture
  • label toys and toy shelves with pictures of the items on them
  • toy cupboards – individual bins can be labeled as well as the place on the shelf where the bin belongs

Rules

  • provide a clear, consistent description of expectations
  • when posted in an accessible place, they can be referred to whenever necessary, such as when your child does not seem to understand what is expected

How to Use Rules

  • decide on the main rules by discussing them with your child, children and others
  • use positive wording to state how your child should behave (e.g., “Walk” rather than “Don’t run”)
  • post in a visible area at your child’s eye level
  • refer your child to the posted rules when he is not behaving accordingly

Schedules

  • help alleviate your child’s anxiety
  • improve your child’s understanding and cooperation
  • provide your child with information about:
    • what regular activities are happening that day
    • what is the sequence of events to come
    • what new activities will occur
    • what is not happening
    • when it is time to stop one activity and start another

photo of schedule with boardmaker pics of breakfast, school, home, swimming, dinner, bedtime

Which Visuals to Use

  • use a maximum of six or seven visuals in the sequence
  • identify times of the day which are noticeably different from each other (e.g., when location changes or when activities change)
  • choose symbols that are general enough that they cover the range of possibilities for the activity (e.g., “lunch time” rather than a specific food)
  • label pictures with the exact words that you and others will use to refer to the activity

Where to Put a Schedule

  • mount in a visible place where the schedule can be referred to easily (e.g., at their classroom desk, in your child’s bedroom)
  • keep it accessible for your child to refer to on his own

How to Use a Schedule

  • choose a specific time(s) of the day where you can go over the pictures on the schedule with your child and name the pictures in order
  • remove each picture once the activity is completed (e.g., snack time is finished)
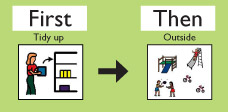
  • show the picture of the upcoming activity especially if your child does not wish to change activities (e.g., tidy up, then go outside)
  • show changes in the regular routine by changing the pictures and describing the change (e.g., no daycare, today stay home)

Mini-Schedules

  • supplement the daily schedule
  • direct choices or sequence of activities
  • are often more detailed than schedules and therefore can teach specific skills

How to Use a Mini-Schedule

Wash Hands Routine

  • provide mini-schedules within the area of your home where additional information is needed (e.g., a “wash hands” mini-schedule above the sink, a “washroom” mini-schedule near the toilet)
  • provide pictures for the main steps required to complete the task (e.g., turn on water, get soap, wash hands, turn off water, dry hands)
  • introduce the mini-schedule to your child during the activity which it describes the specific steps
  • point to each picture and say the words associated with step in the sequence as it is being carried out
  • use consistent language, stressing the main words (e.g., get soap)

First/Then Boards

  • teach logical sequences of events (e.g., “First tidy up, then go outside”)
  • visually clarify step-by-step instructions
  • assist with skill-building by motivating your child to engage in a less-preferred activity knowing that a preferred activity will follow

How to Use First/Then Boards

image of First/Then board

  • the “first” picture is always an activity that you want your child to engage in such as a transition or skill-building activity
  • the “then” picture reinforces the “first” activity by being an activity or object your child enjoys
  • show the first/then board to your child and name the activities while pointing to the pictures
  • assist your child in carrying out the sequence

Choice Boards

  • provide information about what options are available
  • may be used to broaden your child’s play interests
  • prompt your child to make a request or choice
  • clarify spoken language

How to Use Activity Choice Boards:

  • if using the choice board to expand your child’s play interests place some pictures of activities that he does not usually choose
  • if you are trying to encourage your child to make a choice independently, place pictures of activities or toys that he already likes and a picture of a non-preferred activity — to ensure that he is making a choice
  • start by placing 2 pictures of possible activities your child may choose from on a board and gradually add more pictures
  • your child may indicate his choice by vocalizing, verbalizing, or gesturing
  • give your child the indicated choice (e.g., activity, object, food) immediately to reinforce having made a choice

In the Classroom:

There are two different types of activity choice boards:

  1. Classwide – usually consists of a board with activity pockets where each child places his name card in the pocket of the activity in which he would like to engage. There are several variations of this type. The board may have enough velcro spots for the corresponding number of children who can play at each classroom area. Or, each child may have a name pocket where the activity card is placed. Some teachers have each child choose their first activity at the end of circle time using this method. Other teachers require the child to move their name card as they change activities throughout the day.
  2. Individual – a few possible activities are presented on a board. The choices may be presented to broaden your child’s play repertoire (and therefore consist of some activities not usually chosen) or to encourage her to indicate a selection (and therefore depict activities that she already likes). If your child is just learning to make a choice, a non-preferred activity should also be represented to ensure that she is making a choice. Your child may indicate her choice by vocalizing, verbalizing, or gesturing. She should receive the indicated choice immediately to reinforce having made a choice.

Circle Time Song Boards

photo of child using a song choice board with teacher

  • provide the opportunity to make a choice independently
  • help keep attention
  • provide consistent, repetitive language
  • expand your child’s ability to understand and use language

How to Use Song Choice Boards

  • find props or pictures that correspond to a few of your child’s favourite songs
  • make a board onto which the props and/or pictures can be mounted using tape or velcro
  • name the songs represented on the board and ask your child, “Do you want ‘Twinkle, Twinkle, Little Star’ or ‘Eensy Weensy Spider’?”
  • if your child is nonverbal, she can indicate her song choice through eye gaze, pointing, or gesturing
  • if your child uses verbal language, she can indicate a song choice by naming the item
  • remove and hold up the prop or picture for your child to see while singing
  • turn over or put away the prop or picture when the song is finished

Try using some of these visual supports in your home or classroom to help your child understand better and to communicate with others.

References:

Hogdon, L. (1995). Visual Strategies for Improving Communication. Quirk Roberts Publishing.

Taking Care of Yourself

Parents tell us that taking care of their own well being is very important. They do this by taking time for themselves, and pursuing their own interests. This would include getting out of the house on a regular basis and setting aside time to spend with others.

Taking care of yourself is extremely important. It is important to seek help and support when you need it. This will prevent more serious problems down the road. There is a strong link between institutionalization and caregiver burn out. It’s not selfish to take care of yourself; it is in the best interest of those you care about.

There are some things that may help you take care of yourself:

  • Using respite services
  • Receiving help from others and sharing some of the care and support for your son or daughter with them.
  • Joining a parent or family support group
  • Taking time to enjoy a favorite hobby or taking up a new one
  • Taking a course on a subject that you would like to learn more about
  • Having a power of attorney for personal care and for property
  • Taking advantage of the services and supports available
  • Accessing all the financial supports for which you are eligible
  • Seeking out support for yourself if you are dealing with the loss of friends or a spouse or some other significant people in your life
  • Seeking out support for yourself if you are caring for a spouse who is ill
  • Considering housing options that might make your life less difficult. The right place to live can make all the difference. This may mean moving from a house into a condo that is easier to manage, for example. Or it may mean moving to seniors building or to an apartment that is subsidized and therefore affordable.

Originally published in: “Facing The Future A Resource Package For Senior Parents.” By Anne Clements, and Developed by Community Living Toronto, in September 1999, as part of the “The Time Is Now” Project.

How to Support Someone at Work

photo of a person job coaching

Often times when a person with an intellectual disability is beginning any new activity, whether it is work or recreational, they will need different kinds of supports to transition them into the activity.

What is a support staff?

A support staff is someone who accompanies the person to their activity of choice to assist with areas such as; motivation, getting to and from an activity, safety and security concerns, breakdown of tasks and task accomplishment. In a co-op setting, employment training program, or employment program support staff are often referred to as Job Coaches. The role of the job coach is to act as a support at the workplace by coaching the person through their job requirements and the etiquette of the workplace. For example, if the person works at a grocery store stocking shelves, the job coach would instruct and coach the person on how to stock the shelves according to the procedural norms of the store, how long breaks are, how to tell when break time begins and ends, how to handle customer inquiries appropriately and how to fill out time sheets to name just a few areas of their role.

How long should there be a support staff?

It is often joked that the goal of the support staff or job coach is to work themselves out of a job. It is by no means literal but is regularly referred to because it is in the best interest of the person receiving the support to gain as much independence at their activity as possible. Once initial training has been provided and the individual is taking on some of the tasks by themselves (which can be after three months or one year) it is customary for the support staff to begin to phase out. This simply means that when the person is showing confidence that they can take on a task or parts of a task by themselves, the support will begin to step back and not give the hands on direction that they were once providing. It is always important to recognize when to step back when supporting a person with an intellectual disability, for some helpful hints see, ”Ways to Step Back”

Ways to “Step Back”

Adapted from: the American Foundation for the Blind

  1. You’re stepping back so that individuals can step forward and become independent.
  2. Sit on your hands for a whole task while you practice giving verbal instead of physical or gestural prompts.
  3. Let individuals make mistakes and deal with the consequences. It’s part of the human experience.
  4. Step back before you “intervene” when you think an individual may have an “inappropriate” interaction with someone in the community. Your intervention may do more harm than good to the individuals dignity, credibility, perceived competence, etc.
  5. Even though helping can feel right, be aware that too much assistance is short-sighted. Sometimes less is more, less is better. Please don’t contribute to an individuals learned helplessness.
  6. Catch yourself before you correct an individual’s work. This is about their skills …not yours. Things may not fall apart as much as you had expected or the individual may selfcorrect. Give the individual time to work it out alone.
  7. “What am I supposed to do next?” “When is lunch?” Have the individual solve and/or ask a peer instead of you.
  8. Teach individuals to decline assistance, “Thanks, but please let me try Myself.”
  9. Develop natural supports within the workplace.
  10. Whenever you add prompts, include a plan to phase them out.
  11. Let employers know that you need to step back so that individuals can be more independent. You’re not shirking your responsibilities! Collaborate with co-workers, employers, etc. to develop a plan to encourage independence. Agree to remind each other to step back.
  12. Step back to give individuals a chance to ask themselves, “did I do that right?” and the dignity to grow on their own and the pride to feel their own successes.

Remember when you step back you create the ultimate objective – The opportunity to empower individuals.

What is a natural support?

A natural support is someone who is an employee or a regular volunteer at the site the person works or volunteers for. Establishing natural supports and building a level of comfort with them is very important when trying to have the job coach phase out of an activity. This is because it creates an environment where the person can still ask questions and seek help when needed without having a support staff beside them. Having natural supports as opposed to a job coach or support staff hovering over the person also instills a great sense of pride and independence in the person. To an employer it means that the person is capable of completing the tasks that are assigned and is becoming one with the team they work with.

How to support your family member?

If you are not connected with an agency, it is recommended that you try and hire a professional support worker to work with the person at their chosen activity. Unfortunately, it is not always a good idea for family members to support the person at a work or volunteer opportunity for numerous reasons. First, it does not do anything for a person’s sense of dignity and independence. I am sure we can all agree that we did not want our mothers or fathers standing beside us as we worked at our first job. Secondly, the person may not take your instructions as well or as seriously as they would from a professional. Thirdly, it is difficult to fulfill the roles of both family member and support staff at the same time. Creating boundaries around where the support staff role begins and where the role of the family member ends is hard to keep up and if it is not followed correctly it could turn into an explosive situation. Finally, professional support staff know how and when to advocate for people appropriately which is ultimately the most important role a support staff has.

If you are connected with an agency, support staff and job coaches may be provided by the agency. This means that you can focus on your role as the family member and let all of the small details of the activity be left in the hands of the support staff and case coordinators (if applicable.) Listening to the person’s stories about their day at work, volunteer placement or recreational activity will prove to be much more rewarding and meaningful than worrying about supporting them at a retail outlet, animal shelter or art class.

There is never one way to support a person with an intellectual disability. The amount of time support is needed and the ways in which phasing out can be implemented will be depend on the person. The main goal with any activity however, is to create as much independence as possible. By doing so you will be assisting in making the person’s dreams come true.

Success Stories

Photo of Jenny in the office

As planning begins for the future it is always nice to hear about other people’s stories and the success that they have achieved after planning began for them. Here are two examples:

Jenny

The first story is about a young woman named Jenny. Jenny is a bright and vibrant young woman who was enrolled in private school as a teenager. After completing school Jenny had the goal of entering the workforce as a competitively paid employee. However, Jenny and her family experienced barriers in past work placements and after some disappointment decided to turn to Community Living Toronto for assistance.

The first step in realizing Jenny’s dream was to arrange a planning meeting surrounding her career goals. This was the first planning meeting that Jenny was a part of but soon the ideas were flowing. Jenny was not shy about voicing her goals. By the end of the planning meeting, all in attendance were now aware that Jenny wanted to work in the hustle and bustle of the financial district just like her father. Without much delay Jenny’s family were able to network within their own circles and open up an opportunity at CIBC Mellon in downtown Toronto. Through Community Living Toronto, Jenny received a job coach to assist her with her new job and the employer received support by the agency regarding any concerns that they may have.

The opportunity at CIBC Mellon has proven to be successful due to not only the commitment that Jenny has made to her job, but also the involvement of her family in developing such a wonderful community partner and the guidance of Community Living Toronto.

Kheng

Kheng is a smart and warm young man who immigrated to Canada from Cambodia. Kheng and his family faced many hurdles due to language barriers and the family’s limited experience with the developmental sector. Unfortunately, as high school was coming to an end there was not much of a planning process provided to him through the school system. Planning came in the form of putting Kheng on several wait lists for a day program. Due to this Kheng was left sitting at home for the next two years. At the same time Youth 2 Work, a program found at Community Living Toronto had received additional funding and was able to provide Kheng support.

Once affiliated with Community Living Toronto, the first step for Kheng was to reenter his community and introduce him to other individuals who were working and volunteering in their own communities. Kheng did not believe this was possible for him but with time and the encouragement of his new support workers, Kheng began to believe that he too could live a productive and balanced life. Soon Kheng was enrolled in a program to develop his literacy skills five days a week and began working at a cooperatively run coffee shop two days a week.

Although it took two years to introduce Kheng to what a planning meeting is Kheng did not hesitate to begin to start thinking about what his planning meeting would be like and started inviting support staff that he was connected with. During the meeting Kheng was excited to see what kinds of possibilities would be generated for his future. It was at this time that he decided that he would like to work in an office environment in the future.

Photo of Kheng on the lake

Both stories show different sides of what planning can mean to a person. In Jenny’s case, the planning process came before anything else and it proved to be a good way to be introduced to Jenny and what her goals and dreams were. However, in Kheng’s case the planning process was secondary and came much later. This was because Kheng’s needs required that things move much slower to begin with in order for him to first and foremost be comfortable in his community and out of his house.

This illustrates that planning like anything else is unique to the person. The person will identify when they are ready and what they would like to achieve from planning. Once planning does begin however, all that are involved can expect a much clearer picture of what the future will hold.

Speech and Language Disorders

What is a Speech and Language Disorder?

A child’s communication is considered delayed when the child is noticeably behind his/her peers in the acquisition of speech and/or language skills. Sometimes a child will have greater receptive (understanding) than expressive (speaking) language skills, but this is not always the case.

Speech disorders refer to difficulties producing speech sounds or problems with voice quality. This might be characterized by an interruption in the flow or rhythm of speech, such as stuttering (dysfluency), problems with the way sounds are formed (articulation or phonological disorders), or difficulties with the pitch, volume or quality of the voice. There may be a combination of several problems. People with speech disorders have trouble using some speech sounds, which can also be a symptom of a delay.

A language disorder is an impairment in the ability to understand and/or use words in context, both verbally and nonverbally. Some characteristics of language disorders include improper use of words and their meanings, inability to express ideas, inappropriate grammatical patterns, reduced vocabulary, and inability to follow directions. One, or a combination, of these characteristics may occur in children who are affected by language learning disabilities or developmental language delay. Children may hear or see a word but not be able to understand its meaning. They may have trouble getting others to understand what they are trying to communicate.

How is it manifested?

A child with speech or language delays may present a variety of characteristics, including the inability to follow directions, slow and incomprehensible speech, or pronounced difficulties in syntax and articulation. Syntax refers to the order of words in a sentence, and articulation refers to the manner in which sounds are formed. Articulation disorders are characterized by the substitution of one sound for another, or the omission, or distortion, of certain sounds.

Stuttering, or dysfluency, is a disorder of speech flow that most often appears between the ages of 3 and 4 years and may progress from a sporadic to a chronic problem. Stuttering may spontaneously disappear by early adolescence, but speech and language therapy should be considered.

Typical voice disorders include hoarseness, breathiness, or sudden breaks in loudness or pitch. Voice disorders are frequently combined with other speech problems to form a complex communication disorder.

Who is affected?

The prevalence of speech and language disorders is estimated to be approximately 2-19% of children aged 2-5 years old, with a 2:1 male to female ratio. The overall estimate for speech and language disorders is widely agreed to be 5% of school-aged children. This figure includes voice disorders (3%), specific language impairments (7%) and other speech disorders (i.e. phonology, stuttering (1-14%)). The incidence in elementary school children who exhibit delayed articulation (phonological) development is 2% to 3%, although the percentage decreases steadily with age.

How is it diagnosed or detected?

Speech-language pathologists (speech therapists) diagnose and treat or remediate communication disorders in children.

Developmental paediatricians and paediatric neurologists will also sometimes diagnose a speech or language disorder and refer the child to a speech-language pathologist for treatment.

Additional Resources:

Early Abilities (formerly known as Toronto Preschool Speech and Language Services)https://www.toronto.ca/community-people/children-parenting/pregnancy-and-parenting/parenting/speech-language-vision-hearing/ This is a community-based program that provides services and information for children and families. It is for children from birth to five years of age who have trouble talking or understanding language.

Ontario Association of Speech-Language Pathologists and Audiologistswww.osla.on.ca
The Ontario Association of Speech-Language Pathologists and Audiologists (OSLA) is the strong, collective, influential voice for the professions in the Province. OSLA represents, promotes, and supports its members in their work on behalf of all Ontarians, especially those with communication disorders, swallowing difficulties, or hearing health care needs.

Speech Foundation of Ontario (Toronto Children’s Centre)www.speechandstuttering.com
The Toronto Children’s Centre is a specialty service for children with communication disorders. It provides intensive therapy programs for children, ages three to ten, with moderate to severe speech and/ or language disorders. All therapy is conducted in small groups with three to four children and one speech-language pathologist.

Books and Literature:

Communicating Partners, By James D. MacDonald
It is the result of over 30 years of clinical practice and research with pre-verbal and verbal children with language delays, including children with autism, Asperger Syndrome and Down Syndrome. With practical suggestions that are illustrated with personal anecdotes and grounded in research findings, the book offers an innovative approach to working with late-talking children that focuses on building responsive relationships and an understanding of the key stages of communication development.

Enhancing Everyday Communication for Children with Disabilities, By Jeff Sigafoos, Michael Arthur-Kelly and Nancy Butterfield
Practical and concise, this introductory guide is filled with real-world tips and strategies for anyone working to improve the communication of children with moderate, severe, and multiple disabilities. Emphasizing the link between behaviour and communication, three respected researchers transform up-to-date research and proven best practices into instructional procedures and interventions ready for use at home or in school.

Childhood Speech, Language, and Listening Problems: What Every Parent Should Know, 2nd Edition , By Patricia McAleer Hamaguchi
This essential, up-to-date guide explains what parents can do to help. Speech-language pathologist Patricia Hamaguchi employs her 15 years of experience to show parents how to recognize the most common speech, language, and listening problems.

A Parent’s Guide to Children’s Speech: A collection of full length articles and check-lists.
Canadian Association of Speech-Language Pathologists and Audiologists Article available at: www.caslpa.ca

Parentbookswww.parentbooks.ca
Parentbooks offers the most comprehensive selection of resources available anywhere — from planning a family, to everyday parenting issues, to special needs of all kinds. It also has a selection of resources for caregivers, counselors, therapists, educators, and clinicians.

The content contained in this document is for general information purposes. It is not intended to diagnose or treat a child.

Sleep Diary

Sleep time/naptime can be very challenging when a child resists going to sleep or when he is restless during sleep. As a parent or caregiver you have probably had difficulty settling you child down to sleep at one time or another. If you continue to have difficulty with settling your child down to sleep, even after following the suggestions from our “Bedtime Routines” or “Naptime Routines” tip sheet, you may want to try keeping a Sleep Diary.

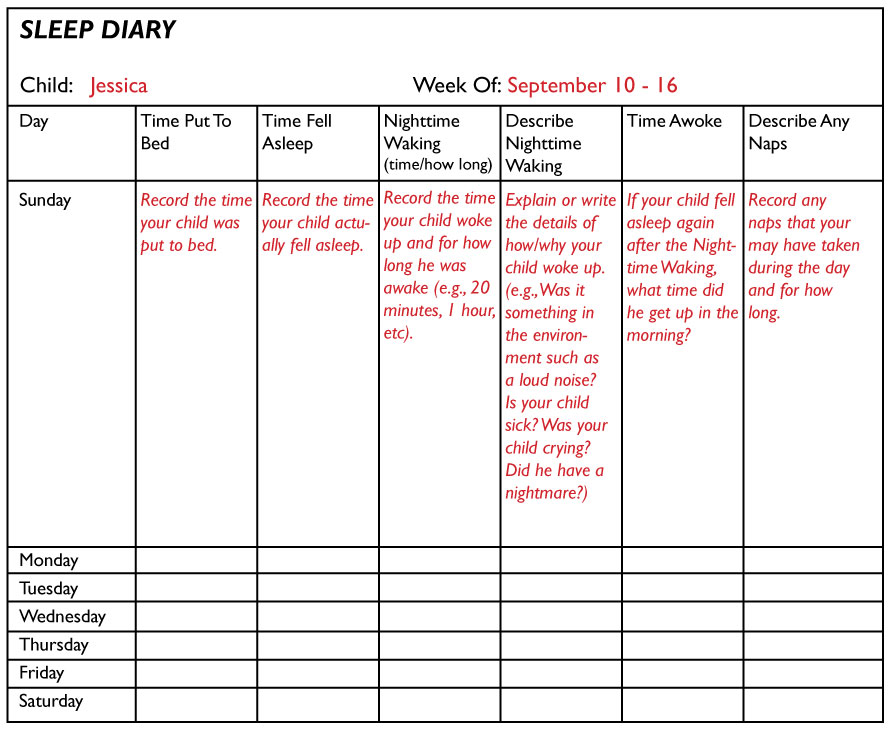
A Sleep Diary allows you to record information from every sleep routine that will help you to see any unusual patterns of sleep. The information you collect can help you identify or see where changes should be made in your child’s routine.

Let’s take a look at some things you’ll be recording in the Sleep Diary:

Keep track of these items for at least two weeks to find out about your child’s sleep pattern. Here are some things to consider when reviewing the completed

Sleep Diary:

  • the amount of time it takes for your child to fall asleep (e.g., Does it take ten minutes or two hours?)
  • how often, and for how long is your child’s sleep disrupted (e.g., How many times does your child wake up?)
  • are night terrors keeping him awake?
  • is your child not tired at naptime?
  • is the bedtime/naptime routine interfering with your child’s ability to fall asleep on his own?
  • information about the time your child wakes up every morning and naps during the day can reveal the total amount of sleep time – Is he getting enough sleep, too little sleep, or too much sleep?

Tracking this information will help you identify the type of sleep problem your child may be experiencing and will help you to begin to plan for change. Also, if you seek assistance from your child’s paediatrician you can show them the Sleep Diary and he may be able to offer you suggestions to help solve your child’s sleep problems.

Keep in mind that sleep problems are very common in children of all ages. A child may experience poor sleep during a brief period in their life, like holidays, a stressful event, or illness. For some children, not being able to settle down to sleep may occur only occasionally and for others it may be more chronic.

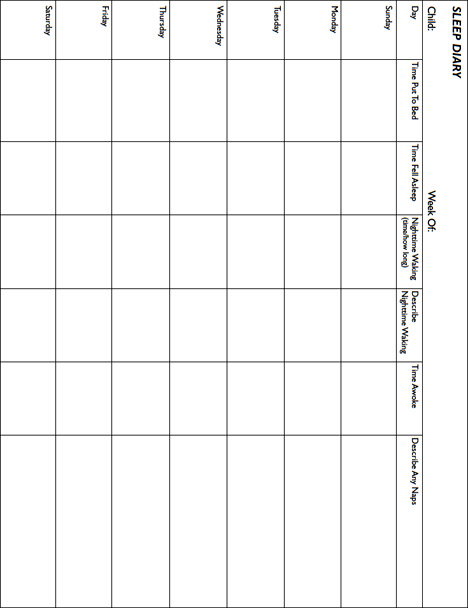
sleep diary template

Services and Benefits

There are a various funding options available from different levels of government and private organizations. They are available to families with children with special needs ranging from developmental support needs to physical/mobility needs. The general purpose of a program that provides funding is to compensate or financially assist families for expenses, services, or devices related to their child’s disability, and to give families a tax break.

Note: Some of the following funding options are based on a family’s income. Consider applying for all funding options regardless of your income as many of these applications take several months to process and your family’s financial situation may change by the time your applications are officially reviewed.

Funding available through the Government of Canada:

  1. Disability Tax Credit
  2. Child Disability Benefit
  3. Registered Disability Savings Plan
  4. Canada Child Tax Benefit
  5. Universal Child Care Benefit

Funding available through the Government of Ontario:

  1. Assistance for Child with Severe Disabilities
  2. Special Services at Home Program
  3. Assistive Devices Program
  4. Easter Seals Society Ontario
  5. Children in Need of Dental Treatment
  6. Ontario Child Benefit

Alternate Funding Sources and Charitable Organizations

  1. Jennifer Ashleigh Foundation

Government of Canada Funding:

Disability Tax Credit (DTC)

What is the Funding?

Revenue Canada offers the Disability Tax Credit for individuals with disabilities. The disability amount is a non-refundable tax credit used to reduce income tax payable on your return. This amount includes a supplement for persons under 18 at the end of the year.

If a child under 18 is eligible for the disability amount, that child is also eligible for the Child Disability Benefit, an amount available under the Canada Child Tax Benefit. See below for more details.

Who is Eligible?

The Disability Tax Credit is limited to individuals who have a severe and prolonged impairment in mental or physical functions. One of the following must apply:

  • The individual is blind, even with the use of corrective lenses or medication;
  • The individual is clearly restricted his or her ability to perform a basic activity of daily living;
  • The individual is significantly restricted in his or her ability to perform two or more basic activities of daily living, and the cumulative effect of these significant restrictions is equivalent to having a marked restriction in a single basic activity of daily living;
  • The individual must dedicate a certain amount of time specifically for life-sustaining therapy, but does not include implanted devices or special programs of diet, exercise, hygiene, or medication.

How Do I Apply?

Begin by completing the Disability Tax Credit Form T2201. The form can be obtained through your local Tax Services Office or at the Canada Customs and Revenue website.

Keep in mind that Part B of the form needs to be filled out by a medical practitioner. This section allows the medical practitioner to provide details about the person’s disability.

Who Do I Contact for More Information?

Contact your local Tax Services Office or visit the Canada Customs and Revenue web site: www.cra-arc.gc.ca
You can also call 1-800-959-2221 for information and/or applications.

Child Disability Benefit (CDB)

What is the Funding?

The Child Disability Benefit is a tax-free benefit of up to $2,504 per year ($208.66 per month) for families who care for a child under age 18 with a severe and prolonged impairment in mental or physical functions.

The CDB amount is calculated according to your base income. The CDB is paid monthly to the Canada Child Tax Benefit (CCTB) eligible individuals. (See below for more details on the Canada Child Tax Benefit)

Who is Eligible?

Families who are eligible for Canada Child Tax Benefit for a child will receive the CDB only if the child also qualifies for the Disability Tax Credit.

Not all children with disabilities will qualify for this benefit. Only children with severe and prolonged disabilities. See the Disability Tax Credit Certificate info sheet to review the eligibility criteria.

How Do I Apply?

Begin by completing the Form T2201, the Disability Tax Credit Certificate.

You must get this form completed and signed by a qualified practitioner (e.g., medical doctor, speech and language pathologist). Send the completed and signed form to your tax centre.

The Canada Revenue Agency (CRA) will determine whether or not you are eligible to receive the child disability benefit. The CRA processes the forms throughout the year, so you do not have to wait until it’s time to file your tax return to submit your form.

You must also apply for the Canada Child Tax Benefit, if you have not done so already.

Who Do I Contact for More Information?

Contact your local Tax Services Office or visit the Canada Customs and Revenue web site: www.cra-arc.gc.ca
You can also call 1-800-959-2221 for information and/or applications.

Registered Disability Savings Plan (RDSP)

What is the Funding?

The RDSP is a long-term savings plan to help Canadians with disabilities and their families save for the future. The “beneficiary” of the RDSP is the person who will receive the money in the future. To help you save, the Government pays a matching grant of up to $3,500, depending on the amount contributed and your family income. The Government also pays a bond of up to $1,000 a year into the RDSPs of low-income and modest-income Canadians.

Who is Eligible?

You should consider opening a Registered Disability Savings Plan (RDSP) if you have a long-term disability and are

How Do I Apply?

Apply through financial organizations(banks) that offer the Registered Disability Savings Plan (RDSP), grant and bond.

Who Do I Contact for More Information?

Contact your local Tax Services Office or visit the Canada Customs and Revenue web site: www.cra-arc.gc.ca

Canada Child Tax Benefit (CCTB)

What is the Funding?

The Canada Child Tax Benefit (CCTB) is a tax-free monthly payment made to eligible families to help them with the cost of raising children under age 18.

The CCTB may include the Child Disability Benefit (CDB), a monthly benefit providing financial assistance for qualified families caring for children with severe and prolonged mental or physical impairments.

Also included with the CCTB is the National Child Benefit Supplement (NCBS), a monthly benefit for low-income families with children. The NCBS is the Government of Canada’s contribution to the National Child Benefit, a joint initiative of federal, provincial, and territorial governments, and First Nations.

Who is Eligible?

To get the CCTB, you must meet all the following conditions:

  • you must live with the child, and the child must be under the age of 18;
  • you must be the person who is primarily responsible for the care and upbringing of the child;
  • you must be a resident of Canada;
  • you or your spouse or common-law partner must be a Canadian citizen, a permanent resident, a protected person, or a temporary resident who has lived in Canada for the previous 18 months.

How Do I Apply?

Generally, you should apply for the CCTB as soon as possible after:

  • your child is born;
  • a child starts to live with you;
  • you become a resident of Canada.

Even if you feel you will no longer qualify for the CCTB because your family net income has increased, you should still apply. The Tax Service office recalculates your entitlement every July based on your family’s net income for the previous year.

To apply for the CCTB, complete Form RC66, Canada Child Tax Benefit Application

Who Do I Contact for More Information?

Contact your local Tax Services Office or visit the Canada Customs and Revenue web site: www.cra-arc.gc.ca

You can also call 1-800-959-2221 for information and/or applications.

Universal Child Care Benefit (UCCB)

What is the Funding?

The Universal Child Care Benefit helps families balance work and family by supporting their child care choices through financial assistance.
This benefit of $100 a month — up to $1,200 a year per child — is paid to parents for all children under six years of age. Payments are made directly to parents so that they can choose the child care that is best for their children and their family’s needs.

The Universal Child Care Benefit is in addition to existing federal programs, such as the Canada Child Tax Benefit, the National Child Benefit Supplement and the Child Care Expense Deduction. This new benefit does not affect the benefits families receive under these programs.

The only exception is that the Canada Child Tax Benefit supplement, a small monthly amount previously received by some families, has been rolled into or combined with the new Universal Child Care Benefit.

Who is Eligible?

All Canadian families with children under six are eligible, regardless of income or the type of child care they choose.
This benefit is taxable in the hands of the lower-income spouse.

How Do I Apply?

Enrolment for the Universal Child Care Benefit is processed through the Canada Child Tax Benefit (CCTB) application. If you are already receiving the Canada Child Tax Benefit, you do not need to apply for the Universal Child Care Benefit. If you are not currently receiving the Canada Child Tax Benefit, you can enroll by submitting a completed Canada Child Tax Benefit application.

Application forms are available on the Canada Revenue Agency website at www.cra-arc.gc.ca

Who Do I Contact for More Information?

For more information on how to receive the Universal Child Care Benefit, visit the Canada Revenue Agency web site at www.cra.gc.ca/uccb or call toll-free at 1-800-387-1193 or TTY at 1-800-665-0354.

Government of Ontario Funding:

Ontario Child Benefit

The Ontario Child Benefit is a non-taxable income-tested monthly benefit paid to low- to moderate-income families with children under 18 years of age. It is paid to all eligible recipients whether they work or not.

Who is Eligible?

Depending on your family income, you could qualify if you:

  • are the primary caregiver of a child under 18 years of age
  • are a resident of Ontario
  • have filed your tax return for the most recent year – and so has your spouse or common-law partner, if you are married or in a common-law relationship
  • have registered your child for the federal Canada Child Tax Benefit

How Do I Apply?

If you are eligible, the Ontario Child Benefit will be included with your Canada Child Tax Benefit and National Child Benefit Supplement monthly payments.

Who Do I Contact for More Information?

For specific information about your payment, contact the Canada Revenue Agency toll-free at 1-800-387-1193

Assistance for Children with Severe Disabilities (ACSD)

What is the Funding?

ACSD provides help to parents to assist with some of the extra costs of caring for a child who has a disability. In order to qualify for this program, financial and medical criteria must be met.

Financial assistance ranges from $25 to $430 per month depending on the family’s gross annual income and the number of other children in the family. A child is also eligible for a dental card (basic dental coverage), and a drug card for prescription drugs.

In addition, the program may help parents with extraordinary costs related to a child’s condition (e.g., travel to doctors and hospitals, special shoes and clothing, parental relief, wheelchair repairs, hearing aid batteries, and financial assistance for basic dental care, drugs, eyeglasses and hearing aids).

Who is Eligible?

Child must be under 18 years of age and live at home with a parent or a legal guardian.
The income of a family will be evaluated to determine qualification.
The child must have a severe disability that results in a functional loss.
Extraordinary costs must be present which are incurred directly as a result of a disability.

How Do I Apply?

Obtain an application form from the nearest Ministry of Children, Community and Social Services (MCCSS) Regional Office.

A Special Agreements Officer (SAO) will review your application and contact you if further information is required. If this is the family’s first time applying, a SAO will make a home visit to meet the child and family and review the information on the application.

Who Do I Contact for More Information?

Contact your local Ministry of Children, Community and Social Services Regional Office. Local offices are listed in the blue pages of the telephone book.
Visit the Ministry of Children, Community and Social Services website at www.children.gov.on.ca

Special Services at Home (SSAH)

What is the Funding?

The Special Services at Home (SSAH) program helps children under the age of 18 with developmental and/or physical disabilities to live at home with their families by providing funding on a time-limited basis to address individual needs. With this funding, families can purchase supports and services that are not available elsewhere in the community.

Each family has a unique set of circumstances. You will need to describe your family’s needs, establish your own goals and indicate the type of assistance you need. For example, funding may be used to access:

  • Personal growth and development to help the child learn new skills and abilities, such as improving their communication skills and becoming more independent
  • Family relief and support to provide respite to the family – families receive support to pay for services that will provide respite/relief

Temporary Expansion of Admissible Expenditures

To better support children with special needs and their families during the COVID-19 pandemic,  eligible expenditures in the programs have been temporarily expanded to support greater flexibility for families. The following expenditures are temporarily admissible until further notice:

  1. Sensory items to support children and youth who rely on sensory items to alleviate anxiety/stress and/or support any clinical or behavioural plans
  2. Technology to provide children and youth the means and ability to stay safe, connected, and engaged at home
  3. Items to support home-based recreation and fitness activities
  4. Personal Protective Equipment and Supplies
  5. Essential Service Delivery Fees
  6. Behavioural Support Plans and Interventions
  7. Ability to hire (non-primary caregiver) family members or neighbours/friends to provide respite

Families who receive SSAH funding can submit eligible expenses for reimbursement through mail, email, fax or through MyDirectPlan.com, a free direct funding management tool.

Who is Eligible?

Children with a developmental disability and/or physical disability (or their families) can apply for this funding if they:

  • live in Ontario
  • are under the age of 18
  • are living at home with the family, or
  • if not living at home with their family, are not receiving residential support funded by a government source.

How Do I Apply?

The program is funded and managed by the Ministry of Children, Community and Social Services.

  1. Review the program guidelines and the April 2020 addendum for more information about temporary changes to eligible expenses. 
  2. Download and complete an application form.
  3. Attach a medical statement or psychological assessment to your application. It should describe the disability and explain why you need the services and their projected cost.
  4. Mail the completed application form and the medical assessment to your nearest regional office. 

Important Additional Information

  • SSAH wait time varies per region and within the fiscal year 
  • It is important to keep a copy of your completed application for your records
  • It can be useful to include a letter of support from your family doctor or consultants/therapists currently working with your child to describe their needs and how funding can benefit the child
  • There is a range of funding which is needs based

Who Do I Contact for More Information?

Contact the Ministry of Children, Community and Social Services to find your regional office.

Assistive Devices Program (ADP)

What is the Funding?

The Assistive Devices Program is administered by the Operational Support Branch of the Ontario Ministry of Health and Long-Term Care. The objective of ADP is to financially assist Ontario residents with long term physical disabilities to obtain basic, competitively priced, and personalized assistive devices appropriate for the individual’s needs and essential for independent living. Devices covered by the program are intended to give people increased independence and control over their lives. They may allow them to avoid costly institutional settings and remain in a community living arrangement.

ADP covers 75% of the cost of some therapy equipment, up to a pre-set maximum. The remaining 25% is the responsibility of the family. Some additional resources may help provide assistance. (e.g. ACSD, Ontario Works, Easter Seals Society).

When the family requires assistance to pay for this remaining 25%, or when ADP does not cover equipment, there may be additional resources that can provide assistance (e.g. ACSD, Ontario Works, Easter Seals Society).

Who is Eligible?

Any Ontario resident who has a valid Ontario Health Card and has had a physical disability for six months or longer is eligible. Equipment cannot be required exclusively for sports, work or school.

Residents with a primary diagnosis of a learning or mental disability are excluded from ADP, as are those on Workers’ Compensation.
There are specific eligibility criteria which apply to each device category. Initial access is often through a medical specialist or general practitioner who provides a diagnosis.

How Do I Apply?

Referral process through clinical prescriber (your ADP registered occupational therapist or physiotherapist).

Who Do I Contact for More Information?

For more information please contact Ontario Ministry of Health at www.health.gov.on.ca

Easter Seals Society Ontario

What is the Funding?

Provides Equipment Funding for costs not covered by ADP, family resources and private insurance.

Provides Incontinence Funding (i.e. diapers, catheters, and enema supplies) for children and youth with special needs aged 3-18, with irreversible incontinence or retention problems.

Application form to be completed by your doctor

Provides up to $3,000/year/client for equipment, meals, and accommodation. Parents are responsible for paying the first $50 depending on their financial situation

Who is Eligible?

Ontario residents aged 3-18 years with a valid Ontario Health Card who live at home or in a group home are eligible. The child or youth has to have a chronic disability resulting in irreversible incontinence or retention problems. A review of eligibility will occur every 2 years.

How Do I Apply?

Forms may be obtained by contacting the Easter Seals Society.

Your child’s Ontario licensed medical doctor must certify that your child has a chronic disability requiring the ongoing use of incontinence supplies and meets the age criteria. Application forms must be submitted by mail. Faxes or photocopies of the application are not accepted.

The family may apply and qualify for one of two grants:

  • Level A: $400 per year for children aged 3-5 years using diapers and/or catheters and/or reusable garments, children/youth aged 6-18 using intermittent catheters, indwelling catheters and/or reusable garments and liners, or
  • Level B: $900 per year for children and youth aged 6-18 years using diapers or for those who use male external catheters.

Who Do I Contact for More Information?

Contact the Incontinence Supplies Grant program for children and youth with disabilities at Toronto: 416-421-8377 ext 314, or toll-free: 1-888-377-5437 (1-888-ESS-KIDS)

The Easter Seal Society – Incontinence Supplies Program for Children & Youth with Disabilities, 1185 Eglinton Avenue East, Suite 706
Toronto, Ontario M3C 3C6

Children in Need of Dental Treatment (CINOT)

What is the Funding?

The CINOT program is cost-shared between the province and the municipality in which the child resides. It was introduced to provide a public health ”safety net” for children who have dental conditions needing urgent care. The CINOT program provides a basic level of dental care to eligible children. Sometimes, not all services recommended by a dentist will be covered by CINOT (e.g., braces to straighten teeth). Therefore, it is important that parents check with their dentist to determine if any services are NOT covered before their child starts treatment. All dentists receive a copy of the CINOT Schedule of Dental Services and Fees, so they can see what is covered. If they need clarification, they can call the local public health unit.

Who is Eligible?

  1. Age – Children age 17 or younger
  2. Dental Conditions – Children who have identified dental conditions requiring emergency or essential care.
  3. Access – Children who have no access to dental insurance or any other government program (e.g. Federal Refugee Program, Ontario Works, Ontario Disability Support Program, or others) and the parent who has signed a written declaration that the cost of the necessary dental treatment would result in financial hardship. Please note that parents may be asked to provide proof of financial hardship.
  4. Ontario Residency – Children must be residents of Ontario and possess a valid Ontario Health Card number.

How Do I Apply?

Contact your local Public Health office to arrange a CINOT screening appointment to determine if the child qualifies or for more information.
The child must be determined to be eligible for CINOT coverage and appropriate form signed BEFORE dental care is provided.

Who Do I Contact for More Information?

Parents must contact their local Public Health office prior to making a visit to the dentist.

Alternative Funding Sources and Charitable Organizations

Jennifer Ashleigh Foundation

What is the Funding?

The Jennifer Ashleigh Children’s Charity provides financial assistance for:

  • Respite
  • Emergency financial relief
  • Specially adapted computer equipment and software
  • Educational programs, materials, instruction
  • Recreation that promotes a child’s involvement in the community

Who is Eligible?

The Jennifer Ashleigh Children’s Charity assists children who are seriously ill, have a permanent disability, are 21 years of age or under and whose permanent residence is in Ontario.

How Do I Apply?

Please call the Charity office at (905) 852-1799 and ask for a Request for Assistance form. The form may be completed by the child’s parent, physician, therapist, social worker, teacher or community liaison.

Who Do I Contact for More Information?

Visit the website at www.jenash.org

Assistance with Funding Applications

www.respiteservices.com

Access Facilitators are available to provide support in developing respite options on behalf of families in Toronto. Short term coordination will be provided in order to overcome barriers to respite. This short term coordination includes assisting families with funding forms, contacting agencies on behalf of families and assisting to connect with workers.

To be connected with an Access Facilitator call 416-322-6317 or complete a family registration form on the website.

Promoting Sharing Through Stories and Role Playing

Sharing is an important social skill that is difficult to learn for many children (e.g., “Would I give another child my toys, if I can have them all to myself instead?”)

Children often become very attached to certain toys and may have a hard time letting other children play with them. They may become aggressive – kicking, biting, or hitting other children – to protect their favourite things.

As toddlers get a little older and start to engage in parallel and co-operative play, they are more likely to be willing to share their toys. But they will still need adult help to give their favourite toy to another child and to wait for their turn to come again.

As a parent, teacher or early childhood professional, you likely spend a lot of time helping your child learn how to share and you probably have some tricks up your sleeve. Here are some ideas to help along the way.

Learning How to Share

  1. Personal Stories
  2. Role-Playing
  3. What is role-playing?

    Role-playing is an interactive way of teaching many social skills. Role-playing consists of acting out social interactions that children would typically encounter. The adults first model the skill and then the children practice it by acting it out. Puppets or other toys can be used as “actors” in the role-play.

    Your children should have an opportunity to play each of the roles, as well as to be an observer.

    Role playing can teach your child the actual words she can say and the things she can do in specific situations. It also gives her an opportunity to practice these new skills with their peers.

    How do I use role-playing to teach my child to share toys?

    • Step 1 – Model the skillTwo or more adults model a situation in which one asks the other to share his/her toys. The specific phrase and behaviour your child or children need to learn are modeled.

      You can role-play a few possible scenarios to prepare for different situations:

      Scenario 1

      Person A is playing with two cars.

      Person B asks, “Can I play with a car, please?”

      A says, “Sure, you can have one and I’ll have one,” and hands one car to B.

      Scenario 2

      Person A is playing with two cars.

      Person B asks, “Can I play with a car, please?”

      A says, “No, I want to play with them both.”

      B says, “OK. Can I play with them later when you are finished?”

      A says, “OK.”

      B goes to find something else to do in the meantime.

    • Step 2 – Select role playersAt first, it is best to have children who are older or more experienced at the skill do the role-play and have the other children watch and comment.

      If possible, give all interested children a turn to do the role-play. It is especially important that your child who is having difficulty has a turn to be part of the role-play.

    • Step 3 – Children do the role-playA small group does the role-play and the other children watch and comment.

      After seeing a few examples, your child who is having trouble with the specific skill can be part of the role-play. Your child should play many different parts in the role-play.

      Encourage the children to role-play different scenarios and outcomes (e.g., when someone says, “No, you can’t share my toys.”)

    • Step 4 – Provide feedbackAll children and adults give feedback to the role-players. Remember, you are modeling how to give positive feedback. Give specific, positive feedback to all children involved in the role-play. For example, “I liked how Ali asked Rebecca if he could use a crayon and how well Rebecca shared the crayons.”

    What are Personal Stories?

    Personal stories are a tool for teaching social skills to children. These stories clearly describe challenging social situations and provide suggestions about how to behave. The goal of a personal story is to increase your child’s understanding of a specific social situation and to offer alternative, appropriate responses to it. By giving your child some perspective on the thoughts, emotions, and behaviours of others, the personal story can help her better predict and understand social situations.

    How do I use a Personal Story?

    It is best to use a personal story when your child is calm and focused. Try reading and talking about the story daily (perhaps at the beginning of the day) so that your child is able to really understand, not when the challenging situation is actually happening.

    Personal stories are always written from the child’s perspective, using positive language in the first person, (“I”) and in the present tense:

    Correct: I sit quietly on my mat during circle time.

    Incorrect: Cheryl must not talk during circle time.

    When writing a personal story, make sure that you only mention what your child should be doing, not what she should not be doing:

    Correct: I tidy up when I’m finished playing.

    Incorrect: I don’t leave a mess after I’m finished playing.

    Before writing a Social Story, be sure that:

    • it focuses on teaching one behaviour or skill,
    • you talk to other adults involved in your child’s life to get their input, as they may have some unique insight into the situation,
    • when possible, involve your child in writing her own personal story,
    • it is written at the appropriate level for your child and has visual supports or pictures, if necessary.

    Depending on your child’s skill level, you can write the personal story using words only or you can add pictures or photographs. Here are some examples of how to use a personal story to teach a child to share:

    A Personal Story using handwritten text and Boardmaker symbols:

    INSERT PHOTO OF HAND-WRITTEN PERSONAL STORY

    A Personal Story presented as a book – using text and photographs

We hope that these strategies will give you some ideas about how to support children who are learning to share their toys. After all, sharing is a social skill that we use throughout our lifetime so let’s teach children when they are young to learn this skill.

Source:

Personal stories are based on “Social Stories” created by Carol Gray.