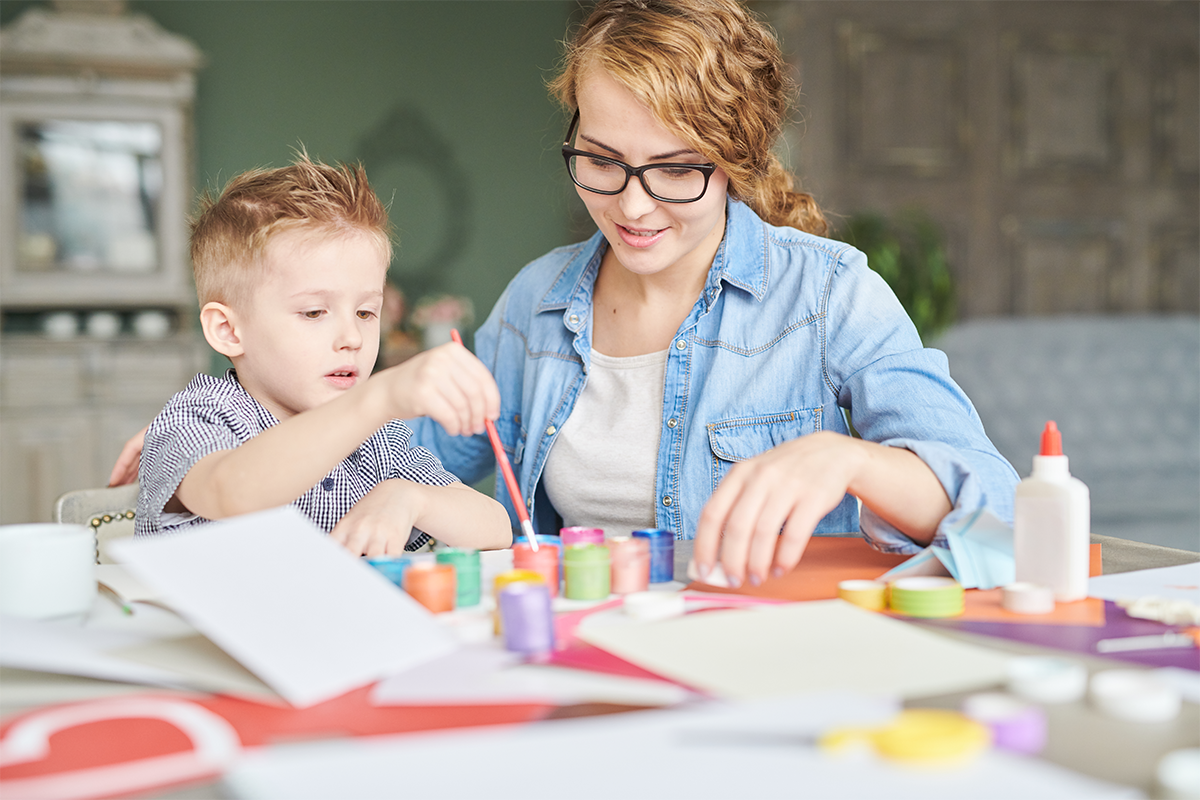
 Creating and using powerful teaching tools for the development of language, social, motor, sensory, and cognitive skills.
Every Toy Has A Number of Teaching Tips, in Five Distinct Areas
Language
Language development has two main parts: receptive and expressive
Receptive language is the understanding of language. Example: If you ask your child “Where’s the ball?” and she looks at the ball. She has received and understood your message.
Expressive language is communication, using language to express thoughts. Most people use a combination of speech, written symbols or pictures and gestures for communicating.
Social
Social skills are life long “people skills” that focus on learning appropriate ways to interact with, and to respond to, others.
Before being able to do this, children must learn to view themselves as individuals who are separate from others.
Motor
Motor skills fall into two basic groups: fine and gross motor.
They allow children to explore and manipulate their environments.
Gross motor involves large muscles such as those in your arms, legs and stomach.
Fine motor skills use smaller muscles such as those in your eyes, mouth, hands and face.
Cognitive
Cognitive refers to the ability to understand concepts, pay attention, reason and remember. These skills help your child to understand and organize the world.
Sensory
Our senses include vision, hearing, touch, taste and smell.
These are used to give information about our bodies and the environment.
The largest sensory system, touch (tactile), is responsible for receiving critical information about texture, temperature, touch pressure as well as pain.
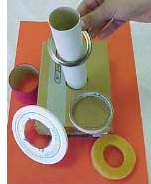
Toys
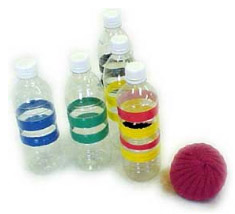
This is a great way to teach turn taking, and it sure can promote physical activity!
Materials
- One litre clear plastic bottles, coloured plastic tape.
- If you want to make a ball, you’ll need a sock, some lentils, and a needle and thread.
Step-by-Step
- Ring 5-10 clear plastic bottles with coloured plastic (PCV) tape.
- Pour one cup of lentils into the sock. Shake lentils to the bottom. Twist sock tightly just above the lentils.
- Holding the twist, sheath the top back over the filled portion of the sock. Repeat twist and sheath until ball is formed. Sew top closed.
Teaching Tips
Motor:
Bowling activity will help develop your child’s large motor skills as she learns to throw the ball to knock down the bottles, and then to pick them up to repeat the process.
Learning to aim also promotes hand/eye coordination.
Social:
This is a great opportunity to learn turn taking.
Start by having your child assist you in setting up the bottles. Indicate you will begin by taking your turn. “Model” by tapping your chest, stating “my turn” before you throw the ball. Set up again, and repeat for “your turn”.
Encourage other kids to join in, observing the “taking turn” rule.
To help your child be as successful as possible.
Accomplishment builds self-confidence.
- Use a bigger ball
- Add bottles
- Get closer
Cognitive:
The concepts of “spatial relationships” is advanced as a child throws the ball and monitors where it lands.
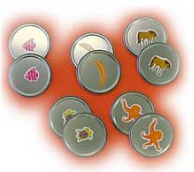
You’ll be surprised at how many times you come back to this game. It fits a wide range of purposes, and its as challenging as you want to make it!
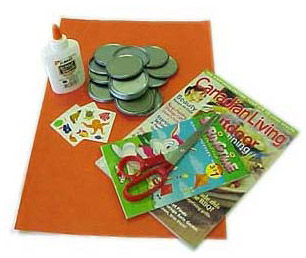
Materials
- Lids from frozen juice containers
- Stickers
- magazine photos
- colouring book shapes
- textured materials
- glue
Success is in gathering the pictures.
Draw and glue letters for letter recognition.
Step-by-Step
Grab your camera (make two prints of great photos) and teach toilet training (pictures of toilet, paper, flush, etc.) or use photos of facial expressions to teach emotions (happy, sad, mad, frightened).
Teaching Tips
Language:
To help develop vocabulary, always verbally “label” pictures for your child. When you’re ready, add written labels to picture disks. Finally try losing the pictures!
Social:
Model how to play the game by taking turns with your child. If your child has difficulties waiting for a turn gently hold her hand while quickly taking your turn. This game, in all its variations, can really help increase a child’s attention span.
Cognitive:
To develop matching skills place two different pictures on the table. Present your child a picture identical to one on the table. Help your child to make a match. Increase the number of pictures on the table as your child’s skill level grows.
For simple “concentration”, begin with 2 pair pictures face down on the table. Encourage your child to make matches by turning pictures over one at a time. Increase the number of hidden pairs as skill level improves.
To develop visual memory, sow your child two different pictures. Remove one picture, and ask your child to describe it. Increase the number of pictures.

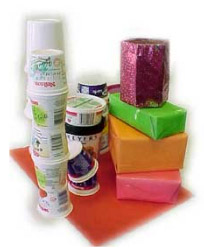
Improve your child’s sense of rhythm, increase appreciation of movement and music, enhance language and social skills.
Materials
- coffee tins or metal cans
- shiny wrapping paper
- construction paper
- tape or glue
- scissors
Step-by-step
- Decorate drums using shiny paper or coloured plastic (PVC) tape.
- Glue different materials around some drums to provide tactile stimulation (sandpaper, bubble-wrap, corrugated cardboard).
Tips for Teaching
Language:
- Use this activity to help your child understand simple directions such as “slow”, “fast”, “brush”, “hit softly”, “beat loudly”.
- Give clear directions. Use simple language. Position yourself in front of your child at eye level.
- Provide hand over hand assistance to help your child follow through.
- Encourage your child to imitate you with her own drum.
- Sing a familiar melody, chant or song to the beat of the drum.
- Sing slowly. Using clear language. Be at eye level.
- Later, pause between lines to encourage her to initiate the next line.
Motor:
- Let your child watch your hand movements as you play the drum. Give her the drum and encourage her to imitate the same hand movements.
- Model more than once or provide physical assistance if needed.
- The drum will help your child develop strength and endurance through her hands and arms.
- This activity will also enhance hand/eye coordination.
- The drum will help improve both large and small muscle control depending on how it is used.
- Encourage your child to use it in different ways and incorporate it into various daily routines. For example – outdoor play – bring the large drum and sticks to be played loud – indoor – set up a small drum for tapping on with hands.
Sensory:
- Drums stimulate the sense through touch and hearing.
- Beating on the drum with both hands will help develop body awareness and promote freedom of expression. This will also encourage creativity and spontaneity.
- Use drums to help your child learn to discriminate sounds and tempos.
- Use various sizes or materials (a tin can or plastic container).
- Beat on one drum then the other. Allow her to imitate you and repeat until she’s able to take notice of the different sounds they make.
- Establish a beat pattern (two fast beats, on slow beat or loud beat, soft beat). Encourage your child to imitate you or develop a pattern between the two of you. (For example, a small soft drum for her and a loud big drum for you).
- Take turns beating to produce loud and soft pattern sounds. Use other materials to beat on the drum producing different sounds (a brush, a pencil, a small rolling pin).
Social:
- Take turns beating on one drum. Indicate whose turn it is by tapping your chest and saying “my turn” or “your turn”.
- Initially your turn should be very brief so the waiting time for your child is not so frustrating.
- Using two drums, take turns playing your own and developing a rhythmic pattern together.
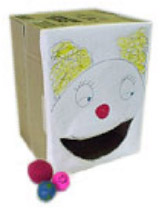
Learning to aim and throw.
Materials
- Large box
- White shelf paper (similar)
- Markers/crayons/paint
- Exacto-knife
- Masking tape
- Glue
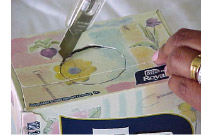
Step-by-step
- Draw a face on the paper to fit the box. Tape it to the box with masking tape.
- Using the knife cut the opening for the mouth. Tape around the mouth to reinforce the opening.
- Decorate with markers/crayons/paint
Tips for Teaching
Language:
Teach names of facial features. Reinforce concepts “in” and “out”.
Motor:
Throwing activities can be great for kids who are learning to stand on their own.
Position your child with her back against the wall.
The act of throwing will encourage her to move away from the wall briefly, and to balance in the standing position.
Gradually, move farther away from the wall.
Feed the Clown will help your child learn to throw with more control and direction and to coordinate hand and eye movements.
Cognitive:
Be creative! Give your clown a name. Make up stories about feeding your clown favourite food (and not so favourite, too).
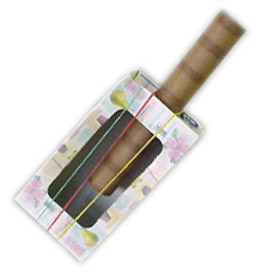
Strumming on the guitar stimulates the senses, refines fine motor skills, and builds appreciation for music.
Materials
- Kleenex box
- paper towel roll
- Elastic bands
- Exacto-knife
- Tape
Step-by-step
- On one end of the Kleenex box, trace around the end of the empty paper towel roll.
- Cut a hole in the box
- Inert the towel tube into the opening. Stretch elastics. Tape elastics at bottom of the box.
Tips for Teaching
Language:
Using this instrument to accompany a familiar song that incorporates words and actions will promote both receptive and expressive language skills. Encourage your child to imitate you as you sing or have her strum the guitar according to your tempo. This will improve listening skills. Learning the words to simple songs helps to enhance language skills and concepts especially when the words relate to specific movements.
Motor:
If your child has difficulty, adapt this activity by using fewer rubber bands or thicker ones.
Have your child play her instrument in front of the mirror so she can have a different view of herself strumming.
Sensory:
Playing the guitar and dancing or singing to the rhythm, your child’s senses will be stimulated in many ways. This exposure will increase body awareness as well as sense of rhythm.
When first introducing this toy, show your child how to hold it and play it. Sing a familiar simple song as you play and move your body to the rhythm. As your child takes her turn, sing along to her sounds or dance making it a fun and enjoyable experience for both of you.
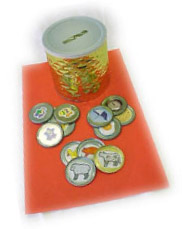
Simple to make, simple to use, juice lid games are as powerful as they are simple.
Materials
- Lids from frozen juice containers
- Containers with lids
- Stickers
- Magazine photos
- Photos
- Colouring book shapes
- “Mactac”
- Glue
- Scissors
- Exacto-knife
Step-by-step
- Cut out slits in container covers wide for beginners.
- What do you want to work on? Glue pictures, drawings, shapes on each lid.
- Use clear adhesive shelf liner over pictures for durability.
Teaching Tips
Language:
- This toy can be used to help your child understand simple directions such as “put in”, “take out”, “open” and “give me”. Give directions once using clear, simple language. Provide hand over hand assistance, if necessary, to help your child to follow through. Reduce assistance as your child learns to understand the instruction.
- For the beginner, use this activity without the lid on the container to practice “in” and “out” concepts.
- You can teach picture names as your child places the lids in the container.
- Use single words and keep them consistent each time you do the activity.
- The juice lid game can also be used to teach shape, colour and/or names of animals.
Motor:
- For children who are learning to grasp and release, this is a good activity.
- Using hand over hand assistance grasp the juice lid and assist your child to release into the container.
- Larger openings in the lid will make this easier. Later you can reduce the size of the hole.
- Wrist rotation is taught by helping your child to fit the lid into the opening.
- This toy promotes hand/eye coordination as your child learns to grasp and move the juice lid towards, and into, the opening.
Social:
- This activity is great for teaching turn-taking.
- Initially, keep all the lids.
- Hand your child one lid at a time.
- After she has put the lid in, take a turn. Say “My turn”, and gesture to indicate when it is your child’s turn.
- Later share turns by dividing the juice lids into a pile for each of you.
- Once mastered, include other children and be certain to enforce the “my turn” rule!
Cognitive:
- For the beginner, use this activity without any pictures on the lids to make it solely a “drop-in” game.
- Focus on placing the lids through, and listening to the sounds they make when they hit the bottom.
- Here’s a chance for your child to problem solve.
- Use juice lids with pictures or drawings of animals, people, fruit, numbers, transportation, etc.
- Provide containers with pictures of the categories you decided to use. Have your child sort lids into the appropriate containers.
- Name the pictures on the juice lid as your child puts them in.
- To work on learning number concepts, count as your child inserts items. You can also ask her to “put one more in” or “give one more”.
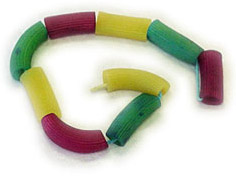
A simple game that requires your child to use both hands cooperatively, encouraging good hand/eye coordination.
Materials
- Noodles
- Spools
- Pipe cleaners
- Yarn
- Shoe laces
- String
- Food colouring
- Masking tape
Step-by-step
- Place slightly damp noodles into a zip lock bag add food colouring and shake.
- Wrap end with masking tape.
Teaching Tips
Language:
Your child will learn to understand simple directions such as “in” and “pull”. Give these directions once using clear, simple language.
Provide hand over hand assistance, if necessary, to help your child to follow through. Reduce assistance as your child learns.
Motor:
- Stiffen the end of the lace or string with tape.
- At first, you may have your child practice putting beads on a thin dowel, pencil or pipe cleaner.
- To start with, choose a small number of thin “beads” with large holes. Noodles are good.
- Increase the number of beads and decrease the size of the hole as your child becomes more skilled.
- Demonstrate how to pull the tip of the lace out of the bead before sliding the bead down the string.
- Provide assistance if necessary.
Cognitive:
Lacing art can be used to extend attention span and to teach the concept of finishing a specific piece of work before moving on to the next activity.
Start with a small number of “beads”. This will depend on your child’s attention span and the difficulty of the task. Add more as your child learns to sit for longer periods of time.
Fun to do, and a powerful tool to teach the concept of “finishing” before moving on the next activity.
Materials
- Construction paper
- Marker
- Crayons
- Hole punch
- Scissors
- Mactac
- Shoelaces or pipe cleaners or yarn
Step-by-step

- Draw a character or use large photos or colouring book art cut out. Apply “mactac” to both sides. Cut out.
- Punch holes around the edge.
Teaching Tips
Language:
Lacing boards can provide a focus for talking with your child. Comment on the character on the board as well as what your child is doing.
Your child will learn to understand simple directions such as “in” and “pull”. Give these directions once using simple language.
Provide hand over hand assistance, if necessary, to help your child to follow through. Reduce assistance as your child learns.
Motor:
For children who are just learning to hold the lace, choose fatter or stiffer materials. You may even want to wrap the end with masking tape, to make it easier to grasp.
Assist your child to grasp the lace, insert it into the hole and pull through the hole.
The process is actually harder than it seems. For some children it may be helpful to have them practice one step at a time, like just pulling the lace through the board. This allows them to feel successful rather than being overwhelmed by the complexity of the task.
Try using simpler designs for your board, spaced further to start with.
Add more holes closer together as your child gains confidence.
Cognitive:
Start with a small number of holes on the lacing board. Make sure the number in manageable for your child. This will depend on your child’s attention span and the difficulty of the lacing task. You want your child to enjoy and come back to it. Add more holes as your child learns to sit for longer periods of time.
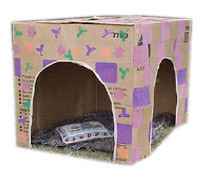
A fun way to help children understand daily routines and situations.
Materials
- Large box
- Paint
- Exacto-knife
- Brushes
- Sponge blocks
- Masking Tape
- Marker
Step-by-step
- Draw arch shaped doors on two sides of the box. Cut the openings for doors using an exacto-knife. Draw a window on one side and cut out.
- Tape around the openings. Decorate using paints with brushes and sponge blocks.
Teaching Tips
Language:
Each week, choose a different set of household items (sleep-time pillow and blanket, meal-time small table, chairs and kitchen utensils) to play different scenarios.
Each scenario, introduce new words or concepts.
During kitchen activity, label “stirring, pouring, mixing”. Encourage your child to request items by with holding props. Give simple directions while playing (e.g., “pour tea”, “put the baby in bed”)
Social:
When playing with your child make the play as realistic as possible by using all the necessary props. For “sleep time”, use your child’s favourite blanket, pillow, pajamas, teddy bear and book.
It is lots of fun to change roles with your child. You be the baby and your child can pretend to be the parent.
If your child has difficulty with a daily routine (e.g., meal time) use the appropriate props to play out a positive scenario. Pretend to feed each other, or feed a doll.
Cognitive:
This activity may enhance children’s understanding of daily routines. First we cook, then we wash dishes. It’s also a fun way to practice self-help skills (e.g., dressing and undressing with play clothes).
My House may be used to help children understand different people and situations in the community and to anticipate upcoming event.
Set up a “Doctor’s Office” to help your child feel comfortable. Use a “play” doctor kit, and a white shirt as a lab coat.
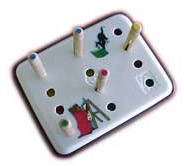
Making a Peg Board is an hour invested in lifelong motor and cognitive skills.
Materials
- Cardboard
- Coloured tape
- Round clothes pins
- Pick up a new Styrofoam meat tray in various sizes from your supermarket.
Step-by-step
- Pressure mark lines of holes on the tray with the top of a marker pen. Cut out with an exacto-knife.
- Place the tray over a larger piece of cardboard. Tape lightly at corners to hold in place. Trace lines of holes onto cardboard. Trace tray shape onto cardboard and cut out.
- Cover lines or holes drawn on cardboard with strips of coloured tape. Secure tray to cardboard with tape around edges and decorate.
- Add colour to the tops of clothes pegs matching the tape used on the cardboard.
Teaching Tips
Language:
Help your child understand simple directions such as “put in”, “take out”, and “give me”.
Give directions once using clear, simple language. Provide hand over hand assistance to help. Reduce assistance as your child learns.
Say the word “more” as you hand the peg to your child. As the routine becomes established pause to allow your child to gesture for more, or to request more using a sound or word.
Motor:
Peg Board can improve hand/eye coordination as your child learns to grasp and move the peg towards, and into, the opening.
If your child has difficulty grasping small objects you may choose to enlarge the peg by wrapping it with tape, or adding foam tubing. The kind used for plumbing insulation is very handy and cheap. Just cut it to size.
Using hand over hand assistance grasp a peg together.
Assist your child to release it into the matching hole.
You may wish to make a Peg Board with spacing for the holes further apart.
Social:
Take turns placing pegs. Indicate ‘turn’ by chest tapping saying “My turn” or “Your turn”.
Initially, your turn should be very brief so the waiting time for your child is not too frustrating.
Cognitive:
Teach colour matching with Peg Board. Starting out, use two colours to match. Make sure that the colours you choose are different enough from each other (yellow and blue rather than orange and red).
Label colours of pegs using single words. Ask your child to give you a specific colour. To make this a little easier, you might start with tow colour options. Place the correct peg closer to your child. As your child becomes successful with this task place the two colour choices the same distance from your child.
When you are confident that she knows one colour introduce the second colour in the same way and then alternate requests for specific colours.
To work on learning number concepts count as your child inserts pegs. You can also ask her to “put one more in” or “give one more”.
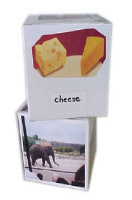
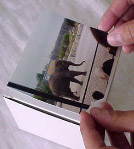
This is a wonderful toy, and a powerful teaching tool. It can be used to increase language skills, encourage communication and socialization, and develop cognitive abilities.
Materials
- Cube box (3” to 4”)
- Photos of familiar people, food, events
- Labels
- Mactac, glue
Step-by-step
- Glue top and bottom of the box together if necessary. Glue photos to all sides.
- Label photos using lower case letters.
- Cut and apply mactac to all sides.
Tips for Teaching
Language:
If you’re working on increasing your child’s vocabulary this toy can help!
Place simple, clear pictures of different objects on each side of the cube.
Name the pictures for your child. Encourage her to imitate your words. Place the picture cube close to your face as you say the word.
Discuss and describe each picture.
For example, an apply is “A shiny, red apply! Mmm! Crunchy and Juicy!” If she’s able, let her tell you about the pictures, too. Ask questions and comment to elicit communication.
Use the cube to expand your child’s receptive language by asking questions. “where is the dog?” or “Show me the cat”. You can also use this activity to teach body parts. Use pictures of different body parts (from magazine pictures or drawings) on each side of the cube.
As your child, “Where is the nose?” or “Show me the eyes”.
If your child has difficulty expressing what she wants, this activity can help address this concern.
Use real photos, magazine pictures, and drawings of things you want your child to communicate to you. Stick them on the sides of the cube. For example, food items (she can tell you what she wants to eat or drink), or home routines (she can let you know if she needs to use the toilet or id she’s tired and wants to go to sleep).
Initially show the cube photo and point out how it will be used. Choose one of the pictures e.g., juice (when you know she may be thirsty). Point and label “juice” using clear, simple language with animated voice tone and expression to attract her attention. Go get the juice and say “juice!” and “You want juice!” Show her the juice cup beside the picture on the cube then give her the juice and repeat the naming.
Social:
To promote elf-awareness and self-confidence make your child’s hand print and foot print (by painting and stamping, or tracing).
Take a photo of your child. Have her draw a picture on a 4’x4’ sheet of paper. Take a photo of your house, and a family photo. Glue and mactac each item onto the cube. Point, name, and discuss each item with your child as you play with cube.
You can use the cube to teach your child about different emotions and feelings.
Make drawings of faces depicting various emotions to place around the cube. Label and discuss each. Encourage her to point to, or label, feelings when asked. You can make it a game by taking turns tossing the cube and imitating the expression of whatever comes up.
If your child has difficulty with transitions (moving from one activity or routine to another) you can use the cube to help her understand daily routines and smooth transitions.
Use photos, drawings or magazine pictures representing your child’s daily routines.
Place on each side of the cube.
Initially you will need to show her how the cube will be used. Before each transition, show your child the photo of what he or she will be doing next.
Label the photo using clear, simple language. Be at eye level. Move on to that routine promptly so he can learn to associate the photo with the activity.
To promote social interaction, use the cube to help your child learn turn taking during a game of “toss the cube.
Take turns tossing the cube and naming the picture that faces up when the cube lands.
If you have several cubes take turns stacking them to make a tower.
Cognitive:
The photo cube can be used to teach numbers, colours, shapes, letters, words, size and names of objects, people and places.
Use photos, drawings, magazine pictures or computer drawings that depict concepts.
Cut out the different coloured shapes to place on the sides of the cube. Label and name the colours and shapes.
Ask your child to find certain shapes and encourage her to name them. If she’s not able to, encourage her to imitate you.
You can make two identical cubes and use this as a matching game, too.
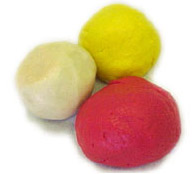
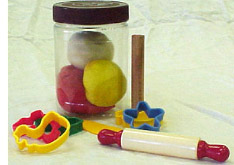
Making play cookies and pizza promotes fine motor skills.
Materials
- 1 cup of flour
- 1/2 cup salt
- 2 teaspoons cream of tartar
- 7/8 cup of boiling water
- 4 teaspoons of vegetable oil
- Food colouring
- Add something smelly, like vanilla or coffee
- Add some glitter
Step-by-step
- Mix flour, salt, cream of tartar. Gradually add boiling water and add food colouring and oil.
- Knead the dough until smooth. Add water or flour for consistency. Store in an air tight container.
Tips for Teaching
Language:
Help your child to understand words such as “squeeze”, “poke”, “push”, “touch” and “roll”.
Comment on what your child is doing, using clear, simple language.
Motor:
Play dough promotes fine motor skills in activities like rolling, patting, poking, grasping, squeezing, and pinching.
Sensory:
Play Dough stimulates the sense through touch and smell. To add to the texture, bury objects in the dough or use scented variations. Start with familiar scents and work towards using stronger smells.
If your child has difficulty tolerating different textures Play Dough can be used in plastic bags.
Later it may be explored with the feet or on other parts of the body.
Social:
Develop turn-taking routines by sharing cookie cutters and rolling pins. Work cooperatively to make shapes such as pizzas or stacked birthday cakes.
Encourage other family members or friends to participate.
Cognitive:
Play Dough may be used to develop imaginative play skills. Your child will love to make cookies birthday cakes, hot dogs, pizza and more. Use cookie cutters, rolling pins, plastic knives and plates to add to the experience.
A variety of shaped cutters can be used to teach shape concepts.
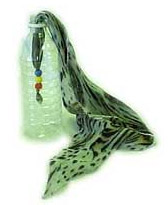
If refining your child’s fine motor skills is a high priority, this is a wonderful activity.
Materials
- A scarf
- A clear plastic water bottle
- Beads with large holes OR if your child puts things in their mouth use clothes pegs or spools.
Step-by-step
It’s important to remember for some children beads are a choking hazard.
Instead of beads, you can clip a clothespin on the end of the scarf.
It works the same way.
Tips for Teaching
Language:
Help your child understand and follow simple directions such as “put in”, “take out”, “poke”, “pull up”.
Give directions once using clear, simple language. Provide hand over hand assistance.
Reduce assistance as your child learns.
Help develop vocabulary by talking about the details of the scarf (Long, red, shiny, soft).
Motor:
Help your child to practice proper grasping and releasing techniques.
Provide hand over hand assistance as she grasps the toy to place it into the bottle, and then grasping the end of the scarf to remove it.
As your child places the scarf into the bottle mouth she is expected to poke continuously until it is fully inserted.
In doing this, she is learning to poke and point using her index finger. Encourage her to continue this task until the end.
Help your child to use both hands in midline (in the centre of her body).
Encourage her to hold the bottle with one hand and poke the scarf into the bottle with the other.
Social:
This can be a great “turn taking” activity.
Take turns poking the scarf into the bottle and then pulling out.
Provide a lot of praise and encouragement as your child cooperates and complete this task.
Cognitive:
Here’s a great opportunity for your child to problem-solve.
They’ll need to figure out how to place the entire scarf in the bottle (perhaps using another tool instead of her finger). Once it’s in, she may invert the bottle expecting the scarf to fall out.
Provide assistance if she appears frustrated in her attempts.
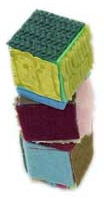
Increase sensory awareness develop fine motor skills.
Materials
- Foam blocks
- All purpose glue
- Lots of textured stuff:
- Foil paper
- Scouring pads
- Pasta
- Sandpaper
- Bubble wrap
- Fur fabric
- Beans
- Cotton balls
- Pipe cleaners
- Non-slip pads
Step-by-step
- Trace around blocks on textured materials and cut to size.
- Apply glue to blocks.
- Press materials onto surface set aside to dry.
Tips for Teaching
Language:
Label the texture and feel of the blocks using single words (rough, soft, furry).
Blocks can be used to help your child understand directions such as “put on”, “pick up” and “give me”.
Give directions once using clear, simple language. Provide hand over hand assistance. Reduce assistance as your child learns.
Motor:
This is a good activity for children who are learning to grasp and stack. Initially, you may need to help. Reduce assistance as your child gets better.
Grasping and moving the blocks towards the tower promotes hand/eye coordination.
Sensory:
Sensory blocks stimulate the sense through touch.
In addition to fingers and hands let your child experience textures on an arm or leg or foot.
Social:
Take turns building block towers.
Hands your child one block. After she has put the block on top, take a turn. Say “My turn” and gesture to indicate when it is your child’s turn.
Take turns knocking down the block towers.
Cognitive:
Have your child copy block towers that you’ve made.
To work on number concepts, count as your child piles blocks. You can also ask her to put on “one more” or “give one more”.
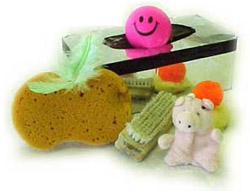
Stimulate the senses. Promote hand/eye coordination. Fun to make!
Materials
- Empty Kleenex box
- Textured materials
- Brush
- Feather
- Sponge
- Fur fabric
Step-by-step
You’ll want to reinforce the opening of the box with masking tape.
Cut textured materials into pieces of various sizes and shapes.
Be on the lookout for new materials.
Tips for Teaching
Language:
Name the textures, colours and shapes of the materials. Use single words to describe each texture such as “soft” and “rough”. Comment on what your child is doing (scratching, patting).
Help your child understand simple directions such as “put in”, “take out”, and “give me”. Give directions once using clear, simple language.
Provide hand over hand assistance to help your child follow through. Reduce assistance as your child learns to understand the instruction.
Motor:
For children who are learning to grasp and release toys, this is a good activity.
Using hand over hand assistance grasp the textured materials and assist the child to release into the hole.
Also assist the child to retrieve the pieces from the box.
This toy promotes hand/eye coordination as your child learns to grasp and move materials towards, and into, the opening of the box.
Sensory:
Sensory Box provides an excellent opportunity to stimulate the sense through touch.
Cognitive:
This activity will help to teach the concept of textures, size and colours. Use single words to describe each texture (soft, rough).
To work on learning number concepts count as your child puts-in and takes-out items. You can also ask her to “put one more in” or “take one more out”.
Allow your child to classify textures such as soft/hard, rough/smooth.
Have your child close her eyes and identify textured materials by feeling them.
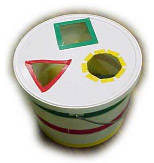
Encourage socialization.
Promote motor and cognitive skills.
Materials
- Container
- Knife
- Marker
- Decoration items
- Sorting “shapes” form around the house
Step-by-step
- Trace shapes gathered from around the house on lid.
- Cut and outline.
- Decorating Tips.
Teaching Tips
Cognitive:
Help your child understand simple directions like “put in”, “take out”, “open” and “give me”.
Give directions once using clear, simple language. Provide hand over hand assistance to help your child follow through. Reduce assistance as your child learns.
To encourage your child to request more keep all the shapes out of your child’s reach. Say “more” as your hand a shape to your child. Gradually, hold the shape a little longer and wait for your child to gesture, attempt to say the word and, eventually, say the word.
You can teach object names as your child places the shapes in the sorter. Use single words and keep them consistent.
The shape sorter can also be used to teach shape and colour names.
Motor:
For children who are learning to grasp and release this is a good activity. Using hand over hand assistance grasp a shape and assist your child to release into the matching hole.
Larger openings in the lid will make this easier to begin with. Later you can add more shapes.
Wrist rotation is taught by helping your child to fit the shape in the opening.
This toy promotes hand/eye coordination as your child learns to grasp and move the shape towards, and into, the opening.
Social:
The shape sorter is great for teaching your child turn taking.
Initially, keep all the shapes. Hand your child one item at a time. After she has put a shape in, take a turn. Say “My turn” and gesture. Indicate when it is your child’s turn.
Later, share turns by dividing the shapes into piles for each player.
Try to include other children at this point and help them to understand whose turn it is.
Cognitive:
Help your child problem solve.
Initially, she’ll use a trial and error approach, trying to put shapes into any opening. Later she will learn to scan openings and choose the appropriate one.
Name the properties of the shape as your child puts them in (“blue square”).
To work on number concepts, count as your child inserts items. You can also ask her to “put one more in” or “give one more”.
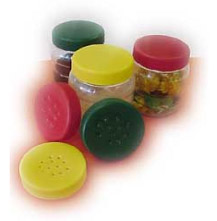
Enhancing sense of smell.
Materials
- Plastic jars with lids,
- Film canisters
- Stuff that smells
- Coffee
- Jell-o powder
- Pot pourri
- Cinnamon sticks
- Lemon grass
- Vanilla beans
- Cardamom pods
- Chocolate
- Hay
Step-by-step
Punch holes in the lids. Use coarse smelly materials to prevent leaking.
Teaching Tips
Language:
Name the scented materials using single words such as “vanilla”, “lemon”. Ask your child which one she would like to smell as your hold two jars with different scents. Name the colour of the jar.
Sensory:
This activity will enhance a child’s sense of smell especially children who have difficulty tolerating certain smells. At the beginning, offer your child a jar that contains a scented material that your child likes. Then introduce additional scent. Place the jars on a tray so your child can easily reach and smell each of the contents of the jars.
Cognitive:
After your child is familiar with a variety of scents, make a duplicate set of smelling jars and put them on a tray. Let your child pair the matching jars.
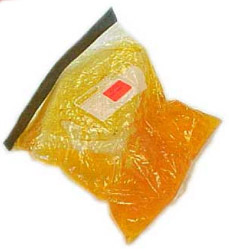
Simple sensory experience.
Materials
- Duct tape
- Heavy-duty freezer bag
- Hair gel OR
- Jello
- Play dough
- Shaving cream
- Whipped cream
- Cornstarch and water
- Pudding
Step-by-step
Fill heavy-duty freezer bag with gel, close the bag and seal with duct tape.
Teaching Tips
Language:
Help your child understand simple directions such as “squeeze”, “poke”, “push”, “touch” and “roll”.
Give directions once. Provide hand over hand assistance to help your child to follow through. Reduce assistance as your child learns.
Name the texture and “feel” of the bag using single words such as “cold”, “soft”, “gooey”.
Motor:
Grasping and squeezing the bag increases strength in the hands.
Sensory:
Squeeze bag stimulates the sense through touch and smell, and enhances body awareness.
Encourage your child to place the bag on different parts of her body.
Use the bag to play hiding games.
Squeeze bag can be used at a variety of temperatures, but be careful not to make it too hot.
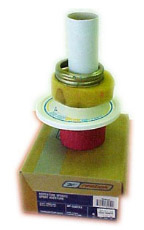
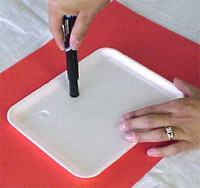
Hand/eye coordination motor development and problem solving.
Materials
- Paint (and paint brush)
- Small, sturdy box
- Paper towel roll
- Rings from sponges
- Empty masking tape rolls
- Cut-out container lids
- Preserving jar lids
Step-by-step
- Trace around the paper towel roll in the middle of the top of the box.
- Cut out the hole and tape the box top to the box. Insert the paper towel roll.
- Decorate if you wish.
Teaching Tips
Language
Encourage your child to request more. Keep all the rings out of your child’s reach. Say “more” as you hand a ring to your child. Gradually, hold the ring a little longer and wait for your child to gesture, attempt to say the word and, eventually, to say the word.
You can teach object names as your child stacks the rings. Use single words and keep them consistent.
The stacking ring can also be used to teach size and colour names.
Motor:
For children who are learning to grasp and release this is a good activity.
Using hand over hand assistance, grasp a ring and assist your child to release it onto the pole. Wrist rotation is taught by helping your child to place the ring on the pole.
This toy promotes hand/eye coordination as your child learns to grasp and move the ring towards, and onto, the pole.
Social:
Teach your child turn-taking.
Initially, keep all the rings. Hand your child one item at a time. After she has put a ring on, take a turn.
Say “my turn” and gesture. Do “your turn” and gesture.
Later, share turns by dividing the rings between the players. Try to include other children at this point and help them understand “whose turn” it is.
Cognitive:
Initially, your child will stack the rings in any order. Later, teach her to scan the rings and choose the appropriate size starting with the largest and stacking the smallest last.
Teach your child about colour and size as she plays with this toy. Name the properties of the rings as your child stacks them (“large yellow ring”).
To work on concepts count as your child stacks items. You can also ask her to “stack one more” or “give one more”.
Powerful problem solving.
Materials
- Plastic containers of various sizes (with lids)
- Boxes
- Wrapping paper paints to decorate
Step-by-step
The secret is being always on the lookout for a wide variety of container sizes, and keeping the toy together in a box.
Teaching Tips
Language:
To encourage your child to request “more” keep all the containers out of your child’s reach.
Say the word “more” as your hand the container to your child. Gradually, hold the container a little longer and wait for your child gesture, attempt to say the word and, eventually, to say the word.
Use words and phrases such as “put in”, “put on”, “take out”, “take off”.
Teach size and colour names (“small”, “big” or “small blue box”).
Motor:
To strengthen your child’s grasp encourage her to take the lid off and put it on again…
This activity will enhance your child’s hand/eye coordination as she stacks containers.
Social:
Take turns nesting or stacking containers.
Take turns knocking down stacks.
Cognitive:
Have your child stack the boxes or containers 9with lids on) in any order, to see the consequences. If a small box is on the bottom the stack will fall over.
Assist your child to stack with the largest container or box on the bottom.
Allow your child to attempt to nest containers (fitting one into another without the lids) through trial and error.
If the child is having difficulty give hand over hand assistance. Reduce assistance as your child understands the nesting concept.
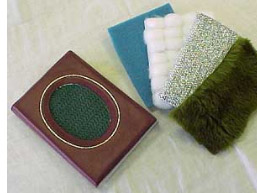
Lots of sensory stimulation
Materials
- Photo album
- Textured stuff
- Fur fabric
- Cotton balls
- Sponges
- Scouring pads
- Non-slip pads
- Foil
- Sand paper
- Bubble wrap
Step-by-step
- Cut textured materials to fit pages and insert.
- Place cardboard between material and plastic. Cut opening to allow material to be touched.
Teaching Tips
Language:
When “reading” this book name the textures, colours and shapes.
Use single words to describe each page (soft, rough). Comment on what your child is doing (scratching, patting, turning pages).
Motor:
The tactile book is great for children who are just learning to turn pages. The stiffness of the pages helps.
To make page turning even easier you can use “page fluffers”. These can be made from a small block of foam ½ to 1 cm thick. Stick to the upper right hand corner of the pages using two-sided tape.
Sensory:
As we promised, lots of sensory experiences are in the book.
Remember to experiment with “how things feel” on arms, legs, cheeks and even feet.
Cognitive:
Teach textures, colours and shapes. Use single words to describe each page such as soft, rough, rougher.
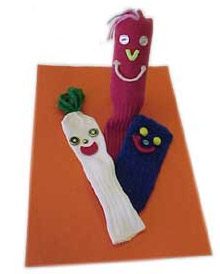
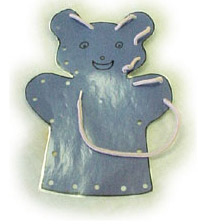
Puppets teach creative and imaginative play.
Materials
- You’ll need some glue
- Pipe cleaners
- Needles and thread
- Socks
- Buttons (don’t use buttons if your child “mouths” things)
Step-by-step
- Draw facial features on the sock.
- Glue or sew yarn as hair. Sew pipe cleaners as nose and mouth. Sew (strongly attach) buttons as eyes.
Teaching Tips
Language:
Help your child learn words of songs and body parts (eyes, nose, mouth).
Puppets can also help your child to express moods (happy, sad).
Cognitive:
Be creative. Give your puppets names.
Bring them to life. Give them personalities. Pretend to feed the puppet. Comb its hair.
Allow your child to experiment with putting the puppet on his hand. You can use the puppet to explain concepts such as “above” and “below”.
Using puppets with mood features can help your child to express how he feels.
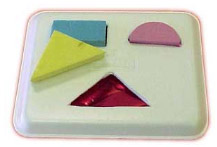
Powerful problem solving!
Materials
- Styrofoam meat tray (new from grocery store)
- Hard sponges
- Coloured paper
- Cardboard
- Marker (pen)
- Knife
- Scissors
- Glue
Step-by-step
- Draw and cut out sponge shapes.
- Trace and cut out shapes in tray.
- Trace tray on cardboard, cut out glue coloured paper to cardboard and tape cardboard backing to tray.
Teaching Tips
Language
Help your child to understand simple directions such as “put in”, “take out”, “open” and “give me”.
Give directions once using clear, simple language. Provide hand over hand assistance to help your child to follow through. Reduce assistance as your child learns.
To encourage your child to request “more” keep all the containers out of your child’s reach. Say the word “more” as your hand the container to your child. Gradually, hold the container a little longer and wait for your child gesture, attempt to say the word and, eventually, to say the word.
Use single words to name each shape and keep them consistent.
Motor:
Puzzles promote eye-hand coordination as your child learns to grasp and move the shape towards and into the opening.
For children who are learning to grasp and release, this is a good activity. Using hand over hand assistance grasp the shape and assist your child to release into the matching hole.
Social:
Puzzles are great for teaching turn taking.
Initially, keep all the shapes. Hand your child one item at a time. After she has put a shape in, take a turn. Say “my turn” and gesture. Repeat for “your turn”.
Cognitive:
The 3-D Puzzle will help your child to learn the concept of matching.
Allow your child time to explore each shape and then provide assistance to place the objects in the corresponding openings.
Initially, your child is likely to use the trial and error method to find the correct opening. With time, your child will learn to look at the shape of the object and to scan the board to find the corresponding opening. You may wish to prompt correct responses by pointing to or tapping the correct opening.
The circle is usually the first and easiest shape to learn since it will fit no matter which way it is turned.
The square is usually taught second and the triangle third. You can make this activity a little more challenging by turning the tray so that the shapes are in different places.
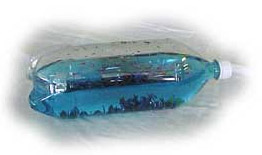
How a plastic bottle and coloured water can help teach language, motor coordination and cognitive skills. Neat.
Materials
- Large plastic bottle
- Sparkles
- Marbles
- Beads
- Soap
- Oil
- Ribbon
- Food colouring
Step-by-step
Fill 2-litre bottle 2/3 with water. Add food colouring. Add marbles. Blue the top of the bottle to prevent spilling.
Teaching Tips
Language:
This activity will help expressive and receptive language skills. As you and your child roll the bottle back and forth, talk about what’s happening (“catch the bottle!”, “here it comes!”).
Help your child understand simple directions. State directions clearly, using simple language such as “roll bottle”, “pick it up”, “give it to me”, “faster”, “slower”.
If your child requires support in rolling the bottle, provide hand over hand assistance.
Make one goal of this game to direct the bottle to another person. Involve a third person and help facilitate the rolling as needed.
Reduce the assistance as your child learns.
Motor:
This activity is a great way to improve hand/eye coordination.
As your child rolls the large bottle using both hands, encourage her to follow the bottle with her eyes as it rolls.
When it tops encourage her to go get it and try again.
Make it a turn taking game, rolling it back and forth. This will give her a specific target to aim for.
Playing with this toy will help build strength and endurance. This will improve both small and large muscle groups.
Social:
Encourage interactive play between you and your child. She will learn to follow simple rules (waiting her turn, or staying between boundaries). She will learn how to play cooperatively and share one toy.
Help facilitate play with another child by stating and modeling the rules of the game and providing hand-over-hand assistance if needed. dxEncourage turn-taking by clearly stating and gesturing whose turn it is.
Toy Shop as written and produced by Fatima Kediye, Raffi Marinuzzo and Margaret Howard of the Early Childhood Services Team at Community Living Toronto.