Introduction to Fine Motor Development
Fine Motor Definition: The ability to coordinate the small muscles of the hand. This includes the ability to grasp, pick up, release, imitate, and copy patterns. These small muscles perform the movements used in writing or holding a pencil.
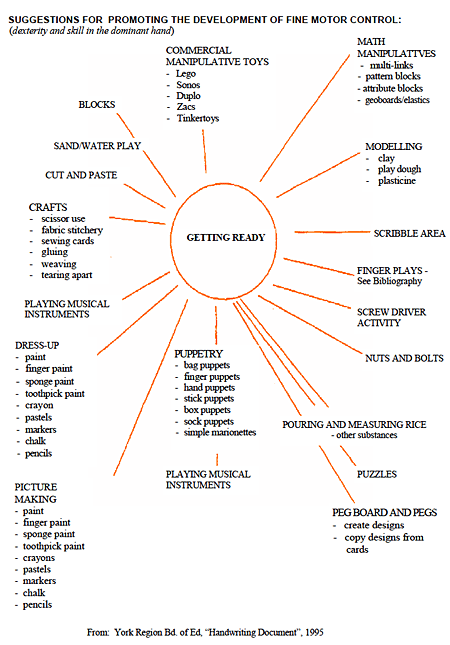
Children benefit from experiences that enhance the development of their fine motor skills enabling them to utilize their hands and fingers. Children need to have strength and dexterity in their hands and fingers, as well as eye-hand coordination, before being able to manipulate a pencil on paper.
The following articles will provide you with strategies, activities, guidelines, and adaptations to help you begin to address your child’s fine motor skills. The activities outlined involve the use of manipulatives, some of which can be purchased and most of which can be made using homemade materials, which will support your child’s fine motor development. Many of the ideas can be implemented during various routines at home. Maryanne Bruni’s article “Having Fun with Fine Motor Development” outlines the various developmental milestones that children go through in reaching their functional level of fine motor ability. It is important to review these stages to have a better understanding of where your child is at in order to appropriately plan and implement activities you can introduce to your child and how to make any necessary adaptations.
Included in this area is a list of diagrams depicting various grasps. From palmer grasp to pincer grasp, you can view each diagram to help you better understand which grasp your child presently uses and what sort of activities you can be providing to further enhance this grasp and help move on to the next stage. When the child has mastered the grasp of holding a pencil correctly, they may be ready to move on to pencil and paperwork. Before getting there though, there should be signs of “readiness” indicating the child is prepared to move from pre-printing skills to pencil and paper activities. Included in this section is a checklist and pre-requisites to “Pre-Writing Skills” which will assist parents and teachers in assessing this area before implementing activities or paperwork. Some activity sheets are provided for introducing pre-writing skills. Also, some strategies to begin to develop the concept of printing letters and numbers are included for the child who is at this more advanced level of writing.
Some children have difficulties with coordinating their eyes with their hand movements together and require further practice in eventually mastering this skill. The article “Development of Eye-hand Coordination” provides numerous activity suggestions to promote this skill area. Learning to use scissors to cut requires eye-hand coordination and hand and wrist control. Included is a checklist for scissor usage which can be utilized in measuring the child’s cutting capabilities and again helping you determine what to expect and how to plan activities accordingly. Suggested “cutting” activities are provided for various levels and capabilities. Some children may require additional support in building their fine motor skills. A referral to an Occupational Therapist may be necessary to help address any
pressing concerns.
Please check out the article Toy Shop for more great ideas on fine motor activities you can make yourself in a few easy steps. We hope you find the following articles useful in addressing your child’s fine motor development.
Compiled and Edited by: Raffi Marinuzzo and Fatima Kediye
HAVING FUN WITH FINE MOTOR DEVELOPMENT
Maryanne Bruni, OT Reg(Ont)
Nov. 1998; Revised: Oct 2004
In fine motor development, babies and young children learn how to use their hands with more and more precision. As newborn infants, the movements of their arms are random, and their grasp is a reflex. By the
time they are six years old, children can make precise movements of their fingers and hands to put together manipulative toys like lego, cut with scissors, begin to print, and pick up tiny objects. There are many
developmental “milestones” that children attain to reach a functional level of fine motor ability. Here is a summary of the main developmental milestones in fine motor development:
- the baby waves his arms to swat at or bang a toy
- the baby grasps something placed in his hand
- the baby looks at and plays with his hands
- the baby directs his arm to reach out and grasp a toy
- the baby drops the toy
- the baby passes toys from one hand to another
- the baby places the toy down
- the baby picks up and places toys down using his thumb in opposition to his fingers
- the toddler picks up small objects using a pincer grasp (thumb and fingertip)
- the toddler coordinates both hands together during play
- the toddler uses tools for a purpose (eg: spoon; crayon; playdoh cutters)
- the toddler scribbles, using a palmar grasp
- the preschooler releases objects precisely (eg: stacking blocks; stringing beads)
- the preschooler uses thumb and fingers to hold a crayon and draws a variety of strokes (lines and circles, dots)
- the preschooler shows a hand preference, but switches when learning new skills
- the preschooler eats and drinks himself
- the child coordinates his hands to learn to dress himself, including zippers
- the child learns to cut with scissors
- the child learns to print
Toddler and Preschool Fine Motor Fun:
In the toddler and preschool years, your child is preparing for the fine motor challenges of the school years through play, creative, and self help activities. Listed below are some suggestions for fine motor play
activities that toddlers and preschoolers usually like, and that you can have fun with together.
Pointing and Poking: Pointing to pictures in book, objects, people etc develops individual finger movement, as your child isolates his index finger. Poking fingers in holes, pushing buttons, doorbells etc. are good strengthening activities for the index finger, which is important for developing pincer grasp.
Hammering and banging: Your child strengthens his grasp and develops control of his arm movement in
activities such as play hammer benches, banging a toy drum with a drumstick, etc.
In and out: Grasp and release control develop by placing toys in and taking out (eg: shape sorters). Scooping sand into a pail and pouring water into cups are great for helping shoulder, elbow and wrist movements.
Apart and together: The coordinated use of both hands develops using apart/together toys, such as pop beads, duplo, Velcro food, stacking cups etc. Your child is also developing matching and discrimination skills in these activities.
Sensory play: Sensory materials, such as sand, water, playdoh, fingerpaint, helps develop important sensory discrimination in the hands.
Self Help: Finger feeding, using a spoon and fork, drinking from a cup, and dressing skills are all meaningful daily activities that help develop fine motor skills.
School Age Fine Motor Fun:
Manipulative toys: Building toys, lacing, pegboards, blocks, transformers and puzzles are just a few examples of toys that require small finger movement and develop strength and control.
Painting, Colouring, Drawing: Children love being given creative license to change a plain piece of paper into one filled with colour! Lots of opportunity to do this will heap them develop their “pencil” grasp and eye-hand coordination.
Multi-sensory visual motor activities: If printing practice with paper and pencil gets boring, using a variety of materials may be more fun: Finger painting, sponge tracing/drawing, drawing in sand with a stick, stickers, stencil tracing, magna doodle, wikki stix.
Cutting: Ripping paper and using tweezers can help prepare the child for holding and using scissors. Learning to cut is a long process. Sometimes small child-sized self opening scissors can help. Begin with single snips on stiff paper and gradually progress to cutting lines etc.
Self help: As children progress in their dressing skills and begin to attempt fastenings, they improve their fine motor skills. Teaching step by step and making some adaptations (such as a zipper ring) can make this process more successful. Spreading and cutting with a knife strengthens the index finger.
Computers: Using a mouse and keyboard develops eye-hand coordination. Sometimes adaptations can make computer use more successful (mouse alternatives, keyboard adaptations etc).
Maryanne Bruni, OT Reg(Ont) – Nov. 1998; Revised: Oct 2004
4.22 USES ULNAR PALMAR GRASP (31/2-41/2 mo.)
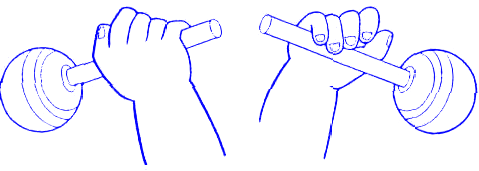
The child grasps an object which is placed in his hand. He uses an ulnar palmar grasp, that is, he grasps the object with the ring finger and little finger against his palm.
- Let the child grasp small toys which fit comfortably into his hand such as rattles with comfortably long, thin handles, teething rings, safe, nontoxic toys.
- Let the child grasp your finger from the ulnar side of his hand.
- Let the child grasp a cone shaped toy with the small end of the cone on the ulnar side of the nd.
4.28 USES PALMAR GRASP (4-5 mo.)
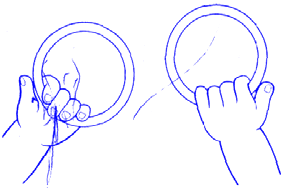
The child grasps an object against the palm without use of the thumb.
- Let the child grasp small toys, such as a block, a spool, a squeeze toy, a teething ring, a bean bag, a peg, a spoon, a teething biscuit, a slice of hard toast.
- Position the child in supported sitting, in prone with weight on forearms, in side-lying or in supine.
4.30 USES RADIAL PALMAR GRASP (41/2-6 mo.)
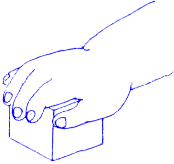
The child uses a radial palmar grasp, that is he grasps an object with his thumb, index and middle fingers against his palm.
- Provide the child with objects she can grasp with one hand.
- Offer the toy toward the index finger side of the child’s hand.
- Place a cube or block in a box or container to encourage the child to grasp with the index and middle fingers side of the hand.
- For the older delayed child: Let her squeeze play dough or therapla (exercise putty) with the index and middle fingers side of the hand.
4.43 USES RADIAL DIGITAL GRASP (7-9 mo.)
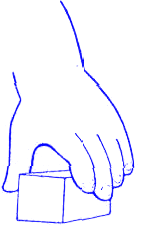
The child grasps an object with the thumb, index and middle fingers without the use of the palm
- Let the child grasp a block, peg. or other toy which encourages the use of his thumb, index and middle fingers.
- Place the object in a cup, muffin tin or egg carton to encourage radial digital grasp.
- Offer objects or finger foods at the thumb side of the hand.
4.44 RAKES TINY OBJECT (7-8 mo.)
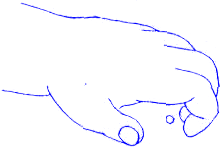
The child grasps at a pellet sized object such as a raisin by using a raking motion. The child flexes the finger toward the palm without using the thumb.
- Refer to 4.40 (Attempts to secure tiny object).
- Encourage the child to grasp small objects placed on a surface within easy reach. Use a bell, a bean, dry cereal.
- Position the child in prone with weight on his forearms, in side-lying or in sitting.
- Caution: Be sure the child does not put small, unsafe objects into his mouth.
4.45 USES INFERIOR P1NCER GRASP(71/2 –10m o.)
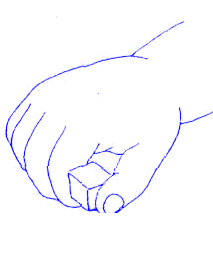
The child grasps a small object with his index finger and thumb. The thumb is positioned at the lateral or lower part of the index finger.
- Offer the child small or thin objects to grasp, such as half-inch cubes, pegs, sticks, bells; also try tiny objects, such as raisins, dry cereal, finger foods
- Place the object on the table surface for the child to grasp.
- Place the object in a bowl or small container to encourage thumb and index finger grasp.
- For the older delayed child: Let him pinch and pull play dough or theraplast with his thumb and fingers
4.49 EXTENDS WRIST (9-10 mo.)
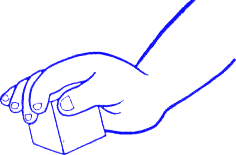
The child extends his wrist during play or during the manipulation of objects.
- Encourage the child to wave bye-bye.
- Position a toy above the child’s wrist level to encourage wrist extension.
- Place textured pictures on the wall which the child can feel with fingers and wrist extended.
- Finger paint by placing the paper on the table, slant board or wall.
- Let the child press down on a squeeze toy.
- Let the child push against a large ball.
- For the older delayed child:
- Let him turn pages in a book. Place the book on a flat surface or on a slanted bookstand.
- Let him press down on play dough with his hand or roll out the play dough with a rolling pin.
- Let him bear weight on his hands with wrist and fingers extended. Position him in prone with weight on his hands and with elbows extended, in hands
and knees position, in side sitting with one hand flat and to the side, and long leg sitting with hands flat toward the back. - Position the child in prone over a wedge, roll or large ball and let the child bear weight on his hands with wrist and fingers extended.
(Hawaii Early Learning Profile – Activity Guide: 1985 Revision)
4.52 USES NEAT PINCER GRASP (10-12 mo.)
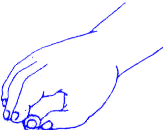
The child grasps a tiny object the size of a raisin with precise thumb and index finger
- Place a tiny object on the table or any surface for the child to grasp one at a time. Use a raisin, dry cereal, other bits of food, a tiny bell, a pellet, a button, or narrow pegs. Be sure the child does not put unsafe objects in her mouth.
- Use tiny objects which do not easily roll away when the child tries to grasp them.
- Place a tiny object in a cup or egg carton cup to encourage the child to grasp the object with his thumb and index finger.
- Place a short, colorful piece of string on the carpet, on the table, or even on the child where she can easily see and reach for it by grasping with her thumb and index finger.
- Provide bits of food at snack time to encourage finger feeding as well as neat pincer grasp.
- For the older delayed child:
- Let her make a collage using various items, such as shells, sticks, macaroni, beads, twigs, leaves, string.
- Let the child pinch and pull play dough with her thumb and index fingertips.
4.55 GRASPS CRAYON ADAPTIVELY (11-12mo.)
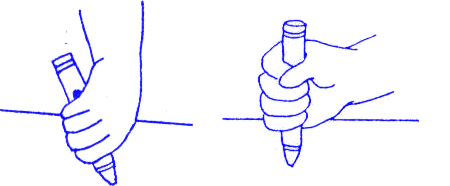
The child grasps the crayon and positions one end of the crayon toward the paper.
- Place a large crayon on the table in front of the child so he can grasp the crayon according to his hand preference.
- Encourage the child to grasp the crayon and help him adjust the crayon in his hand, if necessary.
- Let the child use a large crayon, a felt pen, or chalk.
- Tape the paper down on the table, if necessary, and encourage the child to mark the paper or scribble by imitation.
- Let the child use a stick or a wooden spoon to poke, to make strokes in the sand (wet or dry).
- For the older delayed child:
- Build up the crayon by wrapping a thin layer of foam with masking tape for the child with poor grasp.
- Let the child use crayons which are large enough to fit into his whole hand. These can be made by melting old used crayons and pouring them to set and cool in aluminum ice cube trays, muffin tins or small paper cups. Cut the crayons to desired size.
4.57 SUPINATES FOREARM (11-12 mo.)
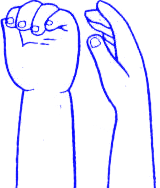
The child actively supinates his forearm, that is, he turns his forearm over so the palm is facing up. The child reaches and grasps for an object with forearm in midsupination, that is, the forearm is positioned with the thumb side of the hand up.
- Encourage the child to do “Pat-a-Cake” by clapping hands together with his forearm in mid-supination.
- Offer the child toys with handles pointing toward him
4.78 HOLDS CRAYON WITH THUMB AND FINGERS (23-25 mo.)

The child holds a crayon with her thumb and fingers, rather than in a fisted hand.
- Place the paper on the table and tape it down, if necessary.
- Place the crayon on the table in front of the child and let her pick it up. She may have a preferred hand, but do not insist she use a particular hand.
- The child can grasp the crayon in her thumb and fingers with her forearm in pronation or palm down position.
- Place the crayon on the table and turn its writing point toward the child’s little finger. Let the child pick the crayon up with her thumb and fingers, palm down. She then adjusts the crayon, turning her fingers so the point of the crayon is in position to make contact with the paper
- Position the child’s hand with her little finger resting on the table. Place the crayon between her thumb and fingers.
- Use large crayons, at first, because they are easier to grasp than the smaller crayons.
4.89 HOLDS PENCIL WITH THUMB AND FINGERS-ADULT-LIKE GRASP (29-31 mo.)
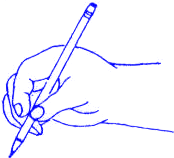
The child holds a pencil with his thumb and fingers in an adult-like grasp.
- Let the child use a primary pencil which is wider in diameter than a regular pencil. It will be easier for him to grasp than a regular pencil.
- Let the child hold a spoon for self feeding with his thumb and fingers in an adult-like grasp, with forearm supination or the palm up position. Refer to 6.63 (Holds: spoon in fingers—palm up).
- Refer to 4.78 (Holds crayon with thumb and fingers).
(Hawaii Early Learning Profile – Activity Guide: 1985 Revision)
Development of Eye-Hand Coordination
Children with learning difficulties may face challenges with integrating and coordinating movements of the hands, fingers and eyes. This basic perceptual skill can be developed and reinforced in a number of ways. Following are some activities to promote this skill area. Each activity can be adapted for different skill levels.
- The adult makes a simple block design and then helps the child to copy it. Start with a few blocks then add more. Use hand over hand assistance if necessary. Increase the difficulty of the designs.
- Matching blocks. The child matches colours by placing a similar block beside one which the teacher puts on the table. Add the different colours one at a time.
- Child matches different shapes, forms, or pictures by putting them into pocket charts, into separate boxes or side by side on the table or floor.
- String beads following a pattern. Start with a few and then add more. Great activity for making necklaces.
- Match real objects to similar pictures. Eg. rubber duck to picture of duck
- Sort objects to encourage the child to find big and little, heavy and light, long and short, etc.
- Use a pegboard to make designs. A design is made on one peg board by the adult and copied by the child on a second board. If you have only one board, divide into two sections with masking tape. Refer to Toy Shop article.
- Encourage child to practice copying simple forms. When the child can reproduce these forms efficiently, and is ready for a bigger challenge, this can be used to develop visual memory as well. Eg. Show them the card for a brief moment and then remove it. Have them reproduce it.
- Draw a “highway” on a large surface area and using small toy cars, encourage the child to try different speeds in manipulating their car through the road map and staying within the limits. Ask them to drive the car to a specific goal or target area on the map, still encouraging them to stay in the lines.
- If your child is ready for the challenge of trying simple mazes, this can be quite fun! You can use a chalkboard or draw them out on paper and make copies for use again. Instruct the child to stay within the lines. Graduate to more difficult mazes.
- Sewing and weaving boards can be easily made (see “Toy Shop” for ideas) or affordably purchased. A fun idea is getting the child to draw out a design on construction paper and having them cut it out (or you can cut if child needs assistance) and then hole punching around the parameter of the design for sewing. If you want it to last, you can laminate the cut-out with clear shelf-paper.
- You can find many workbooks which have “connect- the –dot” pictures or number pictures that encourage the evenness of drawing strokes. The child can be instructed to keep the pencil to the paper until the picture is completed.
- If using colouring books for the purpose of teaching eye hand coordination, choose ones that have clear, simple pictures with thickly lined borders around the design which serve as a guide line for staying within the outlined boundaries.
- Stacking blocks and building towers are fun activities and can be adapted according to skill level. Eg. fewer blocks to build a small tower or many blocks to build model cars or airplanes
- A toy “carpenters” work bench is a great fine motor tool. Hammering nails, turning screws, etc. all promote eye-hand coordination
- Bean bag toss games are always fun and there are so many variations. (Refer to “Toy Shop” for “Feed the Clown” activity) You and place an empty bucket in the corner of a room and take turns throwing a bean bag or small stuffed animal into the bucket. Encourage throwing under-hand . One variation is to draw hopscotch on the ground outside and aim for the square with the highest points.
- A fun interactive game is to play “Flashlight tag. Darken the room and aim your beam on the wall encouraging the child to “tag” your beam.
- Play a sequencing game using sticks of various sizes (the largest one no longer than 12 inches) Instruct the child to lay the sticks out in order from shortest to tallest.
Fine Motor Activities
Here are some additional activities that promote hand strengthening and other fine motor skills which parents can try at home with their children:
- Have your child put together small beads, lego’s, tinker toys, etc.
- Collect small objects from around the house eg. buttons, dry macaroni, beads, etc. Spread them out on the floor or table and encourage your child to pick them up with a pair of tweezers and place them into a container
- Place different sized pom-poms (you can purchase at the Dollar store) into a narrow and wide container. Using kitchen tongs, encourage the child to pick up the pom – poms one at a time with the tongs and place into another empty container
- Water squirt bottles are great for squirting outdoors on the walls, sidewalk, plants, etc.
- Finger painting is always great fun! You can use jello pudding as an alternative to finger paint
- Have fun making necklaces using a variety of materials to string such as: buttons, popcorn, macaroni, cut-up straws
- Get your child to clip clothes pins on containers, around thick cardboard or at the end of a shirt
- Using a hole punch, get child to randomly punch holes around paper to create their own special design
- Have child poke small marshmallows through toothpicks or tiny grapes and serve as snack
- Hide tiny objects or toys in playdough and get child to find them
- Provide clay or playdough for the child to knead and manipulate. You can pretend to make pizza or build a variety of things
- Cutting activities
- Using glue, meat trays or paper and various collage materials, allow child to make a collage or their very own design. If you don’t have glue, you can use syrup or honey and popsicle stick for spreading
- Tear and crumble newspaper; Make a game throwing the crumbled balls of newspaper into recycling bin
